Time for another mannequin mod! (Fiona my crouching MQ)
Posted: Sun May 04, 2014 12:25 am
About a year and a half ago I purchased this mannequin at Roxy Display, and she's been patiently waiting all this time for some improvements.
Sammie's mod was more of an art piece, this one will be more for functional purposes.
So without further ado, here we go!
Here she is at Roxy Display...
http://www.roxydisplayinc.com/webpage/m ... show9.html
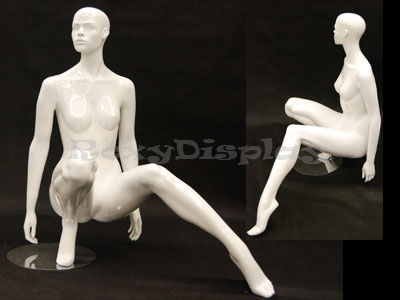
She is, or was rather, the glossy white version of this mannequin...
http://www.roxydisplayinc.com/webpage/m ... e/fr7.html

Of all the mannequins I've looked at, this is probably the best one I've seen for modification for the most number of sex positions.
The legs are in almost perfect position, IMO much better than the kneeling mannequins, with the caveat being that the right leg needs to be turned a bit to get the foot out of the way.
Both legs come off very close to the hip so she makes an excellent torso as well, and the joints have a nice feature that kind of locks the legs into position.
The large notches are for inserting the leg in the joint and the small notches lock the leg into position, sort of clever...
MODIFICATIONS
Fiona came to me with some impact damages to her leg and the paint on her hands was badly blistered so I got her with a pretty good discount.
The first thing on the agenda was to get her paint completely stripped. More on that here: http://dollforum.com/forum/viewtopic.ph ... &start=210
This turned out to be quite a lot of work and about 1-1/2 quart cans of stripper to finish.
The strong 15 min. Klean Strip product from Home Depot worked well for removing the shiny white paint.
New Eyes
Since the original eyes were just sculpted, she will be needing new 3d printed eyes. In order to install them the head needed to be opened up for access.
Drilling a few holes close together, a slot was made to start cutting with the mini hacksaw. This tool works really well for making relatively straight cuts in the thin fiberglass. The Dremel with a small grinding bit was used to finish out the eye holes...
To make the skull piece removable, a bead of epoxy putty will be applied around the edge of the opening on the head, then some saran wrap laid over that and the cut out piece pressed onto it forming a nice seat. I'll use some small screws or maybe some kind of clip arrangement to hold it on, not sure yet.
Insert
I decided to go with the old tried and true Fleshlight for insert, since I already have one and I know it works well and feels good.
I had thought about using one of those Penthouse pussy and ass toys like the Jenna Rose, but it would require foam to hold it in place and I'm not sure how good those units are since I've never had one. The one big advantage of the Fleshlight is that they are widely used and available in many different styles and textures as well.
To make a smooth, safe and seamless install, I have designed and 3d printed a sleeve holder that fits to the body of this mannequin...
The odd looking wheel like thing is a tracing template for cutting the hole in the mannequin. Due to its shape it pretty much locates itself...
1/8" holes are drilled close together, then connected to cut hole, then rotary file bit is used to finish out the opening...
This is the unit loosely installed. It will be epoxied in place and pulled tight with a temporary screw attachment until the epoxy sets.
The flanges are very thin - 2mm, so it can be smoothly blended to the body with epoxy putty or filler.
That's it for now, but there's much more ahead for this mannequin so stay tuned.
MF
Sammie's mod was more of an art piece, this one will be more for functional purposes.
So without further ado, here we go!
Here she is at Roxy Display...
http://www.roxydisplayinc.com/webpage/m ... show9.html
She is, or was rather, the glossy white version of this mannequin...
http://www.roxydisplayinc.com/webpage/m ... e/fr7.html
Of all the mannequins I've looked at, this is probably the best one I've seen for modification for the most number of sex positions.
The legs are in almost perfect position, IMO much better than the kneeling mannequins, with the caveat being that the right leg needs to be turned a bit to get the foot out of the way.
Both legs come off very close to the hip so she makes an excellent torso as well, and the joints have a nice feature that kind of locks the legs into position.
The large notches are for inserting the leg in the joint and the small notches lock the leg into position, sort of clever...
- 002.JPG (499.41 KiB) Viewed 20620 times
- 007.JPG (473.09 KiB) Viewed 20620 times
Fiona came to me with some impact damages to her leg and the paint on her hands was badly blistered so I got her with a pretty good discount.
The first thing on the agenda was to get her paint completely stripped. More on that here: http://dollforum.com/forum/viewtopic.ph ... &start=210
This turned out to be quite a lot of work and about 1-1/2 quart cans of stripper to finish.
The strong 15 min. Klean Strip product from Home Depot worked well for removing the shiny white paint.
New Eyes
Since the original eyes were just sculpted, she will be needing new 3d printed eyes. In order to install them the head needed to be opened up for access.
Drilling a few holes close together, a slot was made to start cutting with the mini hacksaw. This tool works really well for making relatively straight cuts in the thin fiberglass. The Dremel with a small grinding bit was used to finish out the eye holes...
- 001.JPG (751.86 KiB) Viewed 20620 times
Insert
I decided to go with the old tried and true Fleshlight for insert, since I already have one and I know it works well and feels good.
I had thought about using one of those Penthouse pussy and ass toys like the Jenna Rose, but it would require foam to hold it in place and I'm not sure how good those units are since I've never had one. The one big advantage of the Fleshlight is that they are widely used and available in many different styles and textures as well.
To make a smooth, safe and seamless install, I have designed and 3d printed a sleeve holder that fits to the body of this mannequin...
- 001-004.JPG (763.46 KiB) Viewed 20620 times
- 006.JPG (823.64 KiB) Viewed 20620 times
- 006.JPG (863.76 KiB) Viewed 20620 times
The flanges are very thin - 2mm, so it can be smoothly blended to the body with epoxy putty or filler.
- 003.JPG (443.11 KiB) Viewed 20620 times
MF


