Starpery.com

Shoulder Repair - I hope!

Ding! POP! Crash! Thud! oops...let's get her all fixed up!
Post Reply
User avatar
muzza
Doll Mentor
Doll Mentor
Posts: 1500
Joined: Tue Apr 15, 2008 12:00 am
Location: Australia
Contact:

Shoulder Repair - I hope!

Post by muzza »

Warning: this is a long post. It represents my experiences and actions. It is not necessarily representative of the experiences of others.
It is not authoritative and not necessarily the correct way. Being the first there is no precedence.

Yvonne’s shoulder has been loose for many months. First officially reported in May. With a very loose rotation along the axis it was difficult to keep her arm from flopping around during ‘play‘ and posing.
As has been said in the ‘Joint Tightening’ thread, joints do loosen and are better left if it does not cause a problem. However, when it interferes with both play and posing and also locks or freezes because something is jamming - as with Nony - then a repair is necessary.

It must be said that Yvonne was the first production model and Knighthorse have probably learned as much from me as I from them. So this repair was a learning curve for both of us and future models hopefully will have improvements, better quality contol and refined production techniques from the lessons learned.

Well, first up we gotta open her up and have a look to see what is happening.

Image

It can be very scary to cut open a doll. Some say “Oh! I cannot do that.” I did too in the beginning just over a year ago when I had to work on Natasha. Trust me, I am not a craftsman by any stretch of the imagination and cannot match the skills of Mechwizard, Incrediwagon, CJD, Litlluvr, Mahtek - to name just a few - but I am not unhappy with the results and if I can do it, anyone can do it. (That was written before I had to cut again at the second attempt, now I am not so Happy).
Tip: Practice first on samples and test your techniques and the materials you use.

OK, so when we open up we can see what happened.
Image
A bolt unscrewed and jammed against a shaft. But why?
Well, as there is no clearance between the Bolt head and Shaft when the arm is adducted/abducted around 45 degrees plus or minus say 10 degrees, every time Nony’s arm was flexed and extended (forward/back) in that position the rim of the shaft rubbed on the bolt head and unscrewed it. As can be seen here.
Image
The hex head set screw specifically there to stop it unscrewing failed to do so.
You can see the set head screw hole in the photo. Totally inaccessible so unable to use.
Both the clearance and set screw issues have been addressed by KH I am advised.
(There is maybe another reason?, possibly the main reason, which is described later when I had to do the job again - see second attempt below). Anyway,

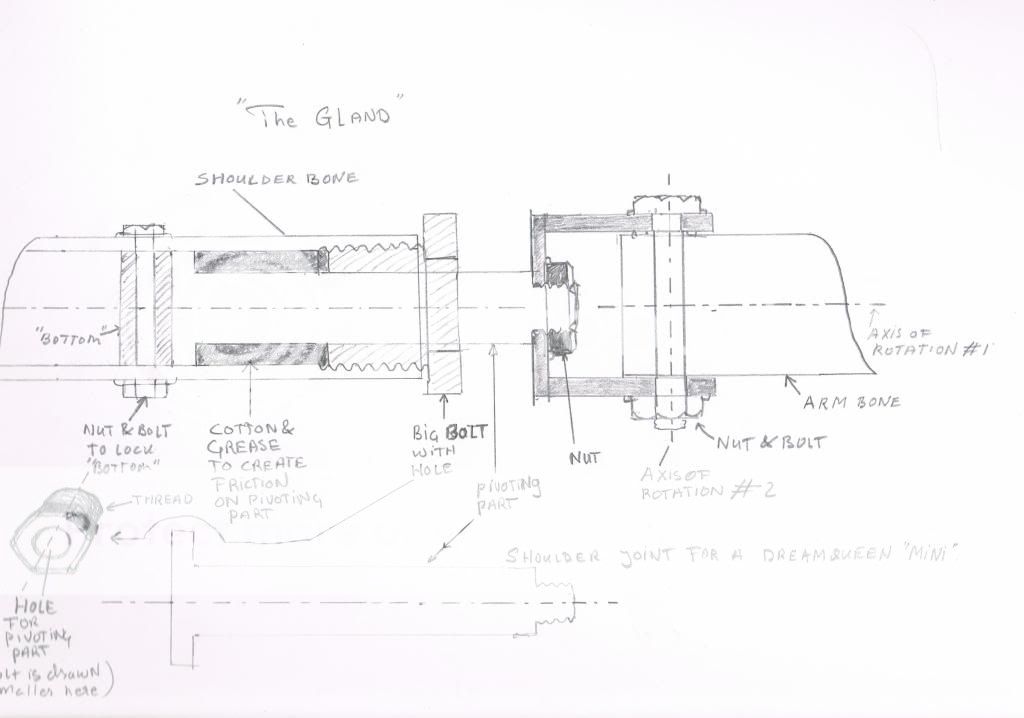
In order to tighten the bolt you have to remove the shaft bolt.
Image
This is a bit awkward because it is a long bolt so the silicone skin has to be pulled right back and as it was a tight fit in the shaft it had to be unscrewed all the way instead of just pulling it out. You can see the threads in the shaft bolt hole. The sort of job where you wish you had four hands.
Once removed you just shift the shaft out the way and tighten the bolt.
As the set screw is not accessible I thought to drill a hole in the top and thread my own screw in to hold the bolt. However the thickness of the shaft and difficulty of doing this ‘at home’ on one’s own made me decide to forget that idea & loctite the bolt using their low strength threadlocker (Loctite 222). (This failed but I did not know at the time - see second attempt).
Before doing so however it is important to tighten the bolt and test the torque required for satisfactory tightness and movement of the joint. Because you cannot spend too much time to adjust it once the loctite is applied without destroying it’s threadlocking. Trust me, it needs to be tightened very, very hard indeed.
So, undo the bolt, apply the loctite (ensuring the washers, bolt & U housing are positioned and assembled correctly) and tighten it up. Partial cure in 20 minutes, full cure in 6 hours.

Now comes a messy bit.
In order to ensure there is no chance of the shaft interferring with the bolt again I decided to trim up the edge of the shaft. Probably not necessary as the rim was already worn flat, but just in case. One could use a file but that is a bit fiddly and as I have a dremel I used that.
I practised on a piece of aluminum flat plate first with many different attachments. The small thin disc worked best.
Image

Specks of alumimum metal everywhere so a clean up was required.

Image

Tip: Alcohol works fine but have plenty of cloth handy as you can only wipe once in one direction then you have to use a new bit of the cloth. If you don’t the specks you just picked up get re-deposited.

Put the shaft back in.
Image

This is also an awkward job to get the shaft, washers and holes lined up at the same time as holding back the silicone and screwing in the bolt. I used a 90 degree screwdriver to keep one end positioned while screwing in the bolt from the other.

Tighten up the bolt and nut to your desired tightness.
Image
Check to make sure everything is in place correctly and all tightened to your satisfaction.

Position your girl with pillows or whatever so the silicone closes pretty much naturally and is all lined up. (no longer possible with the distortion of the cut made for the second attempt).
Image

In the photo I am actually holding her cut slightly open so you can see it, if I let go the cut would close completely. That way you do not have to strain to hold the join together when the adhesive is applied.
And you are now ready to close up.
However, before closing test rigorously. I tested, but not rigourously enough, and thus failed to notice the loctite was inadequate.
With such a thick cut one has to close in stages. Deepest first.
Image

After she was back on her stand, and after a couple of movements all I ended up with was a limp appendage hanging from her shoulder. No flexion / extension holding force whatsoever.

Second Attempt.
It was clear the bolt had unscrewed and would continue to be a problem so a reluctant second attempt was necessary. Yes, necessary, not an option., there was a loose unscrewed bolt inside.

Cutting open over an already cut wound is ‘unfortunate’. As the silpoxy adhesive used to close the first time and the original silicone skin are dissimilar and as it is impossible to cut exactly down the same first cut the wound opens in a distorted way.
No nice clean matching closure line this time. There will be a significant scar. Perhaps a good place for a big tatoo?

Well if loctite is not enough to hold the bolt then, in the absense of any alternative advice, I decided to fit a screw.

Drill the hole. (3.5mm twist drill)

Image
Remove the metal shavings. Piece by piece with tweezers.
Clean up as best as can with cloth and alcohol. (As described earlier).

Tap in a thread. (4mm bolt).
Image
(Having tested the principle first on a practice piece).

I tried using a hex head set screw (grub screw) however this failed and led to near breakage of the allen key. So I decided to use a 4mm screw.
But first it had to be trimmed lengthways to fit and have the end tapered.
I used my test hole, a bolt to hold it steady and a dremel for this.

Image
Then I screwed in the bolt, tightened up the fixing screw and rigourously tested.
The bolt unscrewed. Shit.

OK. What is happening is that the U housing swivels, the nylon washers are supposed to slip on it to provide the movement and then grip. The force required to tighten the bolt sufficiently for the ‘grip’ part of that to hold her arm up against gravity is so great (remember levers) that the pressure of the washers also act to undo the bolt head and the screw is not applying enough pressure on the bolts thread to hold & stop it.

What next? I took it all apart. Assembled the bolt, U housing and washers and tightened to where it holds (I hope). I then drilled down with a 3mm twist drill into the threads of the bolt.
I trimmed up the end of the screw and fitted it down as tight as I could without srripping the head.
And tested.
It held. Unfortunately one is doing this blind. You cannot unscrew the bolt after drilling because there is no way to line up the drilled indentation in the thread with the hole again if moved.

I loctited the screw as tight as I could and now hope it is all tight enough and I got it right.

Image

We will see. Tomorrow when I refit the shoulder joint (adduction / abduction) and test.
Ah Love Could thou and I with fate conspire to grasp this sorry scheme of things entire Would not we shatter it to bits and then remould it nearer to the Heart's desire.

User avatar
CJD
Ex-Member
Posts: 3213
Joined: Fri Jan 05, 2007 12:00 am

Post by CJD »

WOW! I'm sorry you had to do it 2x but you definitly are a doll doc now...nice work! and yes, 4 hands make the job much easier if you can get them.
" Look deep into my ey....er sexy boobies, and fall under their spell. "

User avatar
Mechwizard
Doll Elder
Doll Elder
Posts: 2015
Joined: Wed Jan 09, 2008 12:00 am
Location: Australia
Contact:

Post by Mechwizard »

Because its often hard to know exactly what has gone wrong, doll repair is usually a cut and look exercise, with the cut itself being a guesstimate. The hope is that the cut is the minimum necessary to the job and in the right place. Its never easy.

I think it was a job well done considering you went in blind.

Hey, maybe Zara and Nony can compare scars. Sort of like the two Russians in Rock'n'roller, but better looking.

I hope it finishes up well.
Mechwizard
Consort to the Queen of Curves
http://www.dollalbum.com/dollgallery/in ... ?cat=10796

User avatar
mahtek
Doll Patriarch
Doll Patriarch
Posts: 3538
Joined: Thu Dec 25, 2003 12:00 am
Location: Ohio
Contact:

Post by mahtek »

Fantastic tutorial, Muzza!

I'm sorry that Nony and you had to go through this, but it looks like she is in very capable hands!

It's great that you have shown both what went right and what went wrong. This information is invaluable to anyone repairing any doll.

Let us all hope that this is the last time you need to open her shoulder.

Mahtek & his Ladies
All I ever wanted, all I ever needed is here, in my arms. Words are very unnecessary, they can only do harm.

User avatar
Firefly2008
Doll Advisor
Doll Advisor
Posts: 783
Joined: Sat Mar 15, 2008 12:00 am
Contact:

Post by Firefly2008 »

Very useful information I hope this will be in the repair thread. Shannon's shoulder is a little loose and I brought it up to Bronwen back a while and was told it would be a deep cut (as I can see it is) and I would be better to leave it alone if not seroius. Needless to say I took that advice, but do find this useful should I need to do it at some point. I just got that same dremel you have this week. Needed it for those pesty finger wires. Hope Nony will be good as new now.

User avatar
muzza
Doll Mentor
Doll Mentor
Posts: 1500
Joined: Tue Apr 15, 2008 12:00 am
Location: Australia
Contact:

Post by muzza »

Guys, your comments are kind and generous. Overly so.
I feel more like a butcher than a 'doc' and am somewhat disheartened.
Still, had to be done.

I would like to make the point, My post is NOT a tutorial.
It relays only my experience and what I did.

Although long it still leaves out much and simplifies the process.
Statements like "This is awkward', 'drill the hole', 'tap the thread', 'refit the shaft bolt', 'clean the area' and 'test the tightness' etc, are true but gross understatements. They are messy, tricky, time consuming and not so easy.
Example:
To test the tightness properly you have to tighten the bolt, reassemble the shoulder bolt, fit and tighten the screw, check it, (wrong try again), disassemble and repeat the process. I had to do this maybe seven or eight times before I felt it was right. And even then it is a guess.

Anyway, I assembled the joint this morning and flexed / extended it 10 times. It seems the bolt is holding, but, being blind, how well the screw is going to hold the bolt, only time will tell.

I am waiting a reply from KH about 2 part as I would prefer to close with that, rather than silpoxy.

Firefly,
There are three main movements of this particular part of the shoulder joint.
Adduction/Abduction.
Flexion/ Extension. (This Repair). and
Rotation.
You need to be aware of which one(s) is/are loose and accept loose joints rather than cut unless something is broken or jamming.
Ah Love Could thou and I with fate conspire to grasp this sorry scheme of things entire Would not we shatter it to bits and then remould it nearer to the Heart's desire.

User avatar
mytime
Doll Oracle
Doll Oracle
Posts: 8956
Joined: Thu Apr 03, 2003 12:00 am
Location: The Netherlands
Contact:

Post by mytime »

Hi Muzza,

This looks to me to be a great fix, I hope for you that it holds up.

I've been thinking a lot about round tubing for the minidoll skeleton, also due to that I can get it easily.
I've been thinking a lot about a shoulder joint and an elbow joint.
Both need rotation.
I think I have invented something that may hold up better than this idea.
I want to test drive it. If this 4 mm set screw fails to hold the bolt it may help.
The idea still resides only in my head (like the whole minidoll skeleton does).
I need to draw parts and create them and test drive them, only then we know if it works.
I'll create a drawing from the shoulder I have in mind it will probably fit in a lovable doll. If we can help each other on this point it may solve the issue.
The thing I developed for the minidoll is a good joint and I think it will help you and maybe even LD, I offer it to them by putting it here this evening, but it is not the complicated ever lasting friction joint but it has more simularities with a gland (called in Dutch a "pakkingbus") used on old (steam) ships. I think I have found a partner for developing that one complicated one and we want to develop that for strictly own usage.

Mytime & Helen & Carmen
Image
One dream, one mission...

User avatar
mytime
Doll Oracle
Doll Oracle
Posts: 8956
Joined: Thu Apr 03, 2003 12:00 am
Location: The Netherlands
Contact:

Post by mytime »

Hi all,

I hope this picture tells you how it may be possible to find a solution for a joint that pivotes in a hollow round tube, as I have it in mind for my DreamQueen mini doll. Its a raw & rude drawing :(... sigh... I seem to be tired, but I hope you get the idea. Its a gland as used on old steam and motor ships. Where the arm tube is, is normally the propellor :lol:
Image
LD uses round tubing in the shoulder too, so it may work for their fullsize Lovable Dolls.
Muzza can create this joint in Nony if he wants I think, by modifying bolts and nuts from a hardware store, and tap in a thread in the shoulder tube.
It was my intention to help Muzza and Nony if the 4 mm security bolt fails, thats why I drawed this.
If LD sees a virtue in this joint, feel free to adopt it, though I would apreciate some help & ideas on pouring silicone in exchange, we all love this dolls, I think we should drop each other a line now and then.
(*Discussing it in chat with nzdude lead to the idea of applying a sleeve (tube) over the bolt in rotation axis 2 in the U shaped part to prevent that joint from fixing too much but allowing it to turn*)
Hopefully our dolls will not sail away due to that they contain sea steamer parts.

Mytime & Helen & Carmen
Image
One dream, one mission...

User avatar
mahtek
Doll Patriarch
Doll Patriarch
Posts: 3538
Joined: Thu Dec 25, 2003 12:00 am
Location: Ohio
Contact:

Post by mahtek »

Muzza,

This may not be a tutorial, but it is a gold mine of valuable information.


Mahtek & his Ladies
All I ever wanted, all I ever needed is here, in my arms. Words are very unnecessary, they can only do harm.

User avatar
muzza
Doll Mentor
Doll Mentor
Posts: 1500
Joined: Tue Apr 15, 2008 12:00 am
Location: Australia
Contact:

Post by muzza »

SHOULDER REPAIR - POSTSCRIPT.

Well, the job had to be done as the joint was damaged and the bolt unscrewed but I do not recommend doing it if not absolutely necessary.

Furthermore, without tightening or rectifying the very loose rotation on the axis, the action of the shoulder is still problematic for posing and manoeuvre.

Nony's scar is noticeable, possibly made worse by me trying to close the first time (remember I had to open her up twice as the loctite on the bolt did not hold) with clear adhesive. I thought the clear would reflect the surrounding skin tone but was wrong.

Anyway, from a distance it is not too bad.
Image
Image

Cheers.

muzza
Ah Love Could thou and I with fate conspire to grasp this sorry scheme of things entire Would not we shatter it to bits and then remould it nearer to the Heart's desire.

User avatar
Musician
Doll Mentor
Doll Mentor
Posts: 1174
Joined: Sun Feb 24, 2008 12:00 am
Location: Washington State
Contact:

Post by Musician »

Muzza,

Congratulations on geting this problem resolved. I'm sure it must have weighed heavily on your mind the whole time.

That scar doesn't look too bad in the photo. I'm sure it looks huge to you, just as it would to me if it were Roselle.

But Nony still looks smokin hot!
"The truth can never be wrong, even if no one hears it." - Mahatma Gandhi
My Doll Album: www.dollalbum.com/dollgallery/index.php?cat=11765

User avatar
Mechwizard
Doll Elder
Doll Elder
Posts: 2015
Joined: Wed Jan 09, 2008 12:00 am
Location: Australia
Contact:

Post by Mechwizard »

That's a damn good effort considering the dramas you have had.

Dolls are not like cars and they don't come with a workshop manual to show you where all the bolts, shafts and joints are. Surgery is always exploratory and the first owners for any doll model, such as Muzza, are in a worse position because they are the pioneers.
Mechwizard
Consort to the Queen of Curves
http://www.dollalbum.com/dollgallery/in ... ?cat=10796

Post Reply

INFORMATIONS