Forum Rules,TOS and Privacy Policy | By visiting this website and viewing the pages within, you accept and agree to be bound by and comply with our Rules Of Conduct, Terms Of Use and Privacy Policy
Above are just a couple more examples of pulley layout configurations for reference and study. These helped me in figuring out my own pulley layout plans.
pulley design drawing.jpg (677.86 KiB) Viewed 2290 times
Above is my design drawing of a bearing based pulley. The bearing is in the middle and a plastic disc is on both sides sandwiching in the bearing. These discs prevent the string from coming off the outer race of the bearing. The top rope comes down, wraps around the outer race of the bearing, then goes back up. The bottom rope goes through the center of the bearing and then ties off on the bottom. This handoff between the forces of the top rope and bottom rope is where the magic happens of the mechanical advantage doubling. Trading speed for torque. The plastic discs on either side of the bearing I am able to tie snug to the bearing by threading a string through the center of both discs and the bearing and then wrapping that around the top half of the whole pulley and tying it off. I do this with another wrap going around the bottom half too. These don't interfere with rope travel and hold everything together solidly. Below is a diagram where you can see the two ties I'm talking about from a side view with the two discs and the bearing spread apart so you can see everything better - this is called an "exploded view" where the parts are spread out for easier visibility.
Note: the ties that hold it together are nylon upholstery thread. The glue I'm using is 401 glue generic stuff off ebay. The plastic discs are clear plastic I salvaged from blueberry, strawberry, and sushi produce containers. That type of plastic is perfect for this. The same plastic is also found in coffee cake, other cakes, etc. It's like plastic "display" plastic that is very clear and fairly firm but very flexible. It seems ideal for pulley making. These can be cut to size with little 4" titanium straight embroidery scissors. Wearing a magnification visor for accuracy is recommended for this.
Note: I have to make custom pulleys because there are none commercially available at these tiny sizes from the shopping attempts I did (if I'm wrong on this, let me know)
exploded view of bearing.jpg (738.59 KiB) Viewed 2290 times
I put a little super glue onto these strings pictured above to stiffen them and prevent their knot from untying and solidify everything more generally. But you should apply the glue by dipping the tip of a sewing needle into the glue so you just apply a tiny amount at a time so none gets into the bearing or any other unwanted area.
Now I am working on the actuation of a index finger first as actuating the hands is a hard challenge in robotics and has never been done with human level strength, accuracy, speed, and range of motion while simultaneously keeping all actuators within the confine constraints of a human arm between the bones and skin where muscle would be. At best, we've seen people greatly increase the size of the forearm to be the size of a thigh in order to cram in enough motors and electronics to pull this off. So they "cheated" in some sense by just upping the size rather than solving the miniaturization challenges required to fit this all inside a human form factor. So I might be the first to downsize to fit the human form factor. Anyways, that all said, the pulleys must then be very small for the fingers to pull this off as we'll need to fit a ton of pulleys into the forearms. So for this, I went with 1x3x1mm ball bearings I bought on aliexpress. They're only like $25 for 200 of them so very cheap. I will bump up to larger bearings once the torque conversion demands it. These tiny bearings can only handle I think like 3lb of force on them. So once the forces multiply in the down-gearing system enough, I will switch to bigger pulleys as needed. The next size bearings I'm using are 2x5x2.5mm bearings. These can handle around 22lb placed onto them. I'll finally switch to custom made plain bearings once I exceed 22lb of force for the last couple pulleys of the 64:1 down-gearing Archimedes compact pulley system. Each bearing in the down-gearing process has twice the forces placed onto it than the previous bearing upstream of it. So the motor is like .42lb of force coming off its shaft at 0.25cm away from its central axis point which is about where our string wrap will average, so the first bearing ups that to .84lb of force so a 1x3x1mm bearing can handle that. Next doubling is 1.68lb of force. Again, 1x3x1mm bearing can handle that. Next doubling puts us at 3.36lb force. again a 1x3x1mm bearing can handle that (although it's pushing it - we'll see in testing...). Next doubling is 6.72lb force. 1x3x1mm bearing cannot handle that much so we switch to 2x5x2.5mm bearing for that pulley. And on it goes till we hit the last couple bearings which exceed the force even the 2x5x2.5mm ball bearings can handle. For those two bearings we are going to make custom stainless steel plain bearings using stainless steel tubing I bought that just has to be cut to the length we want with a dremel to make a simple plain bearing that has no balls in it. This type of bearing can handle much higher forces because it doesn't have little balls that can be crushed. It will have more friction internally though but that's the tradeoff we have to make to keep the sizes tiny as possible. The final force the pulley system outputs is around 27lb. So 27lb of force will bend the two most distal joints of the index finger. Due to the mechanical advantage loss that happens at the joint itself, I estimate around 5.4lb of force will be all the finger joint can finally lift. So if the robot were to put its hand palm up and pull its index finger back and forth signalling a person to come over here - that movement - for that movement it should be able to pull a 5.4lb weight. That is about the same amount of weight I think my index finger could lift and with great difficulty. So it will be as strong or stronger than me on this joint pair. I say joint pair because the index finger distal two joints share the same muscle for their actuation. They move together at the same time.
Here are some prototype pulleys in progress of being made. I have 7 of 9 pulleys done so far for my prototype Archimedes compact pulley system design 64:1 downgearing system. The total size of the 64:1 downgearing system is 11cm x 6mm x 1cm. This is a very convenient form factor for placing lots of these in the elongated spaces of a humanoid robot where muscles would normally be located.
IMG_1915.jpeg (2.91 MiB) Viewed 2289 times
IMG_1916.jpeg (1.61 MiB) Viewed 2289 times
IMG_1918.jpeg (1.42 MiB) Viewed 2289 times
IMG_1919.jpeg (1.47 MiB) Viewed 2289 times
The total draw of the cable wrapping around the motor's output shaft is 24in and since it is 64:1 down-gearing, 24 / 64 = .375" is total draw at finger. This works out well I think because that is about the amount of movement I expect is needed to fully bend the index finger at these two distal joints. When we do down-gearing for other joints in the human body, more cable draw will surely be needed like 2" of draw etc for various muscle contraction distances elsewhere. So for this, to still pull off 64:1 down-gearing, we'll have to modify the complex pulley system and the total size of the system will end up being significantly larger. That will be unfortunate but unavoidable. Some of these more powerful muscles will also need bigger and stronger pulleys to handle the forces involved with the bigger motors. So size goes up there too. It's all solveable though imo. We have bigger spaces to work with for that stuff unlike the ones we are doing now which is tons and tons of pulleys in small spaces handling the intricate fingers actuations. So tiny is a must for this part with the hands but not as big of a must for other larger and less complex and intricate parts of the body.
double stacked pulleys side view.jpeg (1.04 MiB) Viewed 2228 times
double stacked pulleys front view.jpeg (978.74 KiB) Viewed 2228 times
Above are double stacked pulleys front and side views. One disc on either outside part and one disc in the center that splits the two bearings up. I have to add a black string across the bottom to prevent the yellow rope from skipping over the center pulley disc and hopping into the bearing next to it so that both ropes are sharing the same bearing and rubbing on eachother. That's bad. So a black string running across the bottom will make that jump impossible. So still have to add that. But overall, as long as tension is kept on this setup, it works well. I've tested it and it is working nice and smoothly. Still needs more testing but so far so good. You can see that all my knots and strings are coated in super glue. This is to prevent the knots from untying and just solidify everything more. The clear plastic discs are made from plastic cut out by hand from blueberry, strawberry, and sushi containers from the produce section of the local grocery store. Cakes also have this kind of plastic. It is firm but flexible with great memory to bounce back to prior shape if it is bent temporarily out of alignment. Pretty decent and nice and thin. I like it for this. I think it's less likely to break than a 3d printed disc. I cut it into these tiny discs just by eye with 4" straight titanium embroidery scissors.
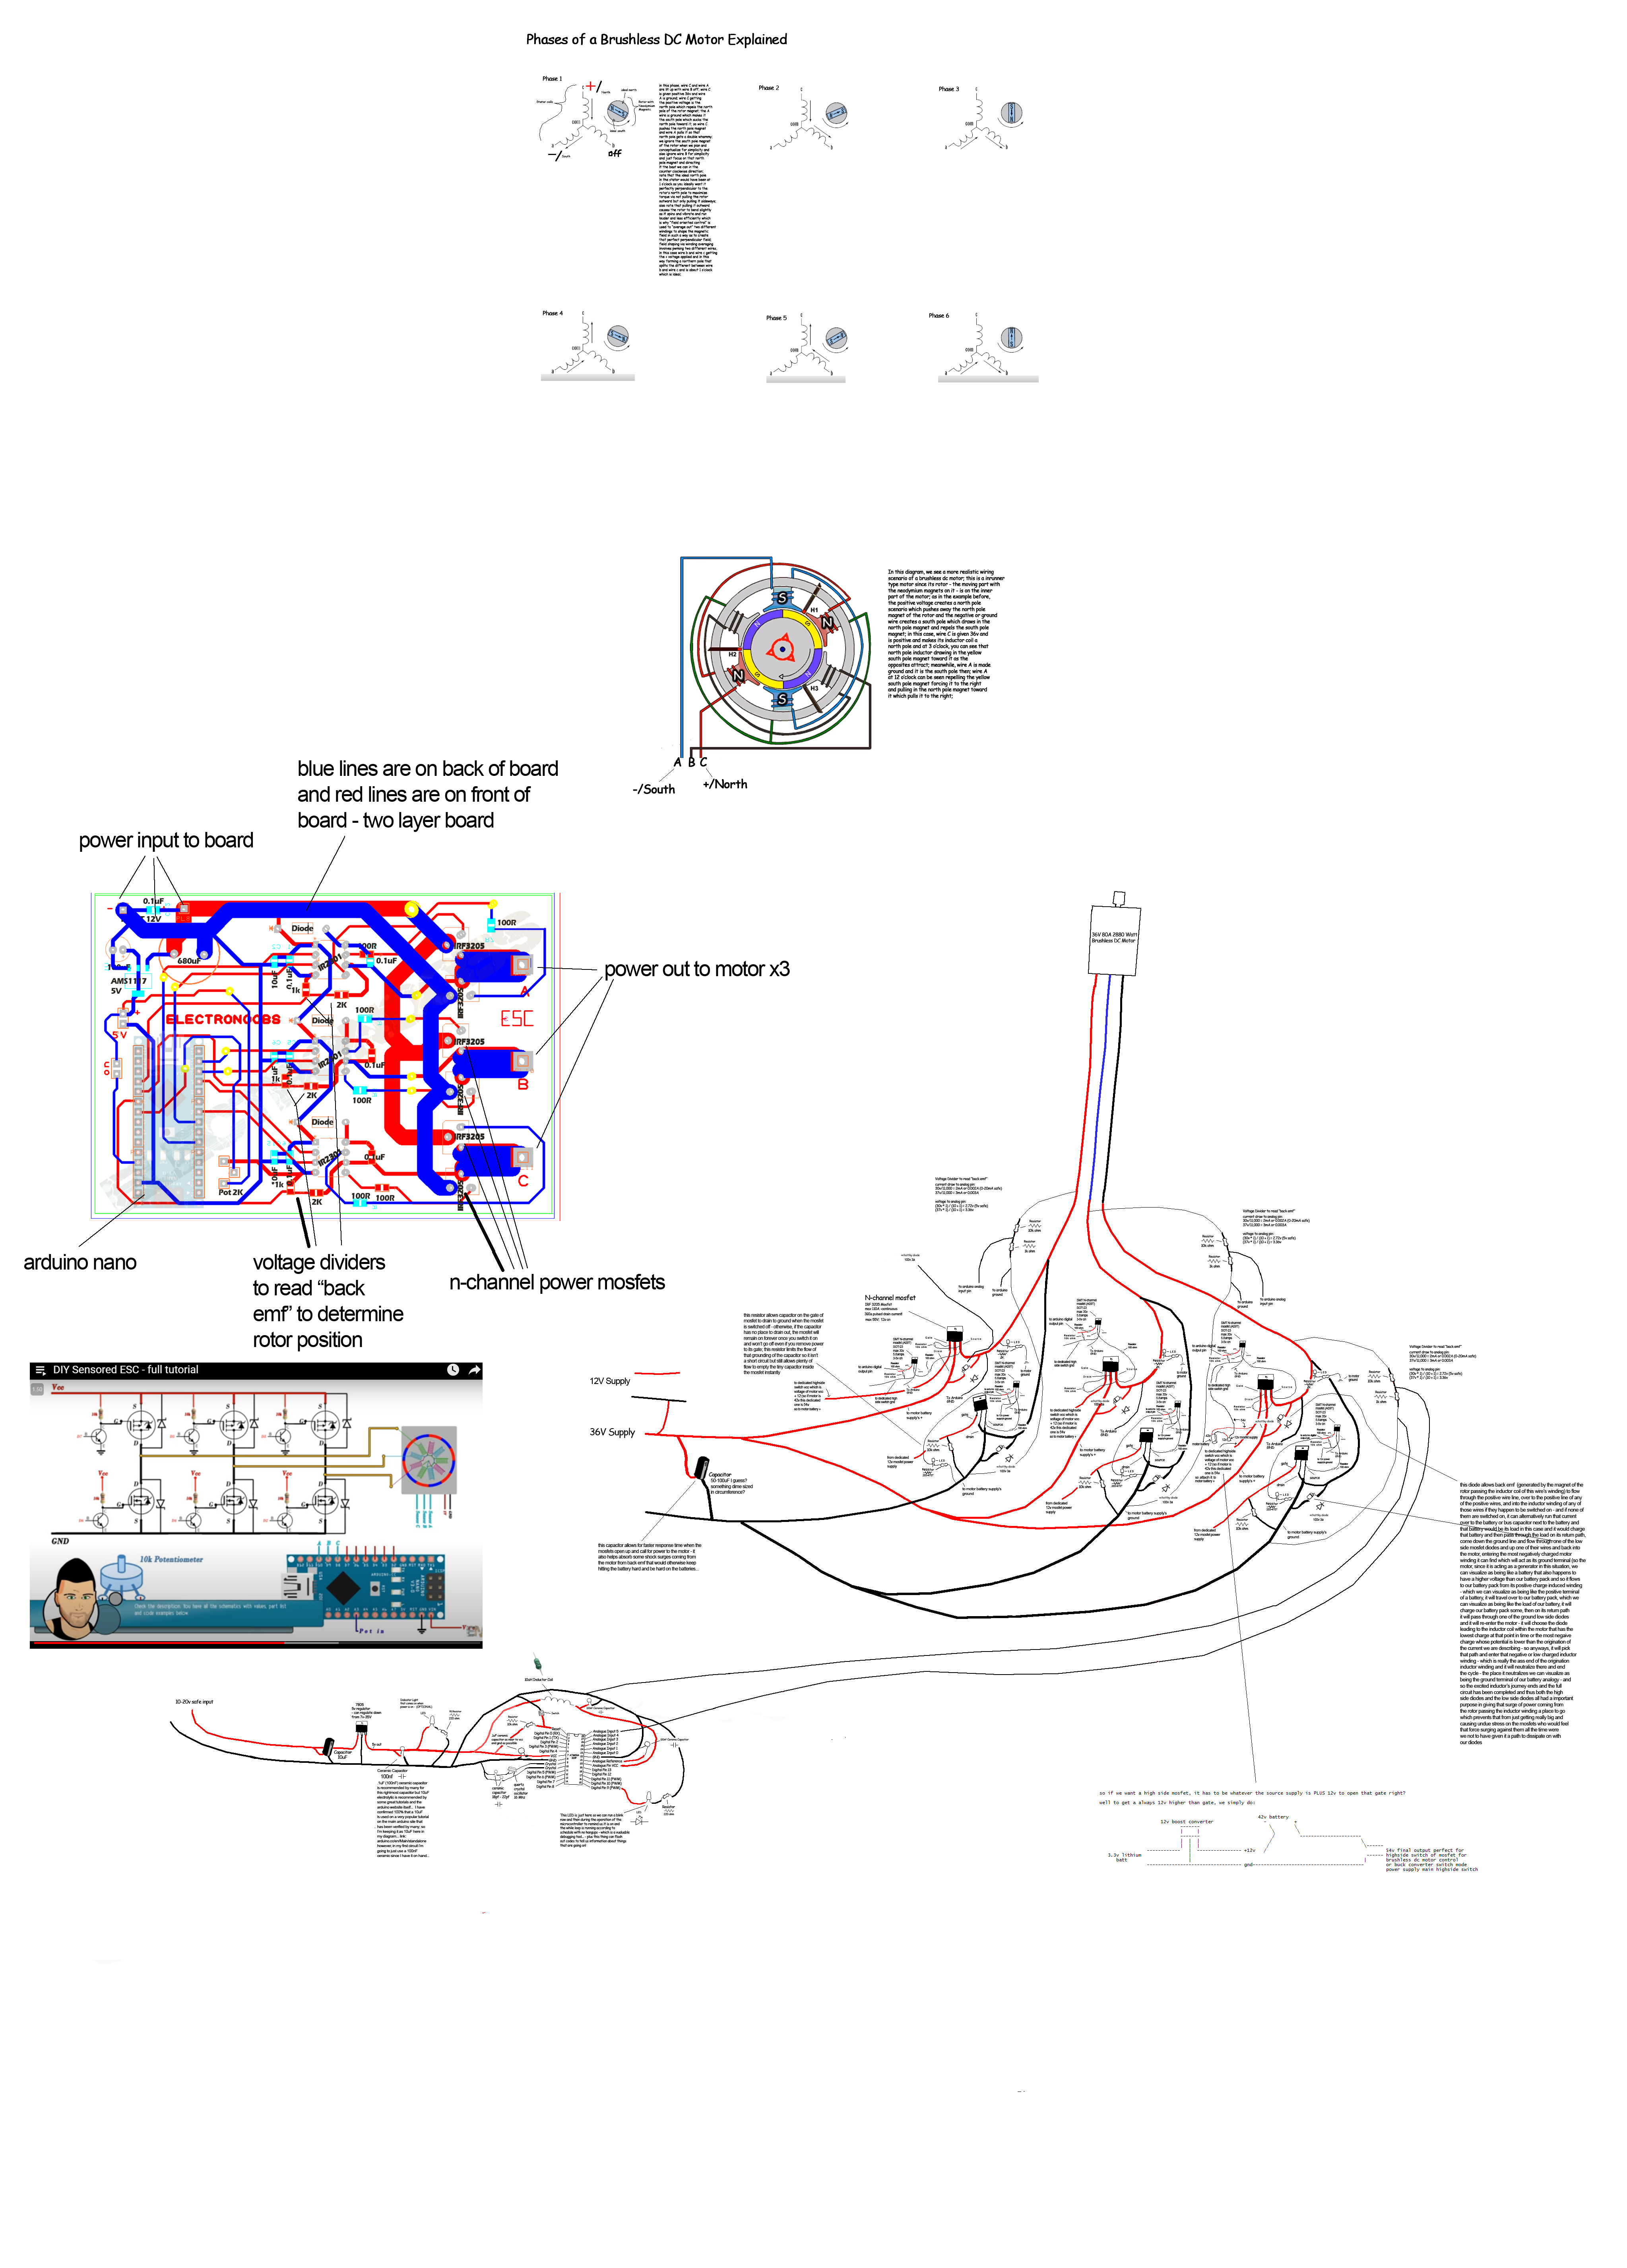
Above are the schematic and notes in both 2d and 3d for my custom brushless dc motor controller design. I made a 3d version to help me visualize the layout better. It is to scale with all parts modeled. I am able to follow this while constructing my prototypes. I am 95% done building a couple prototypes for the motor controller and plan to test soon. Little LEDs will light up on each power mosfet when it actuates so I can troubleshoot. Plus it will look cool. I'm planning to use a logic level mosfet to drive the main power mosfets. I've seen people do this with transistors to power the main power mosfets so I think the same principle applies to a logic level mosfet to switch on power to the main mosfets.
arduino mega barebones cad design.jpg (383.66 KiB) Viewed 1901 times
arduino mega barebones flat flex progress.jpg (44.15 KiB) Viewed 1901 times
Above is my CAD model of a Arduino barebones custom microcontroller in 3D and also of my progress so far on prototyping it. Note that I soldered flat flex cable with matching pitch directly to the pins of the Arduino mega microcontroller chip. This will enable me to get the smallest possible microcontroller form factor possible IMO.
Miniaturization is everything for me to fit everything I need to fit in the cramped spaces in my complex robot design. It is actually pretty easy to solder flat flex ribbon cable directly to the microcontroller IC chip once you get the hang of it (but you must wear a visor magnifier to zoom in on it visually as this is tiny tiny detailed work). To do it, you first lay down the ribbon cable and masking tape it down securely, then lay the chip on top and masking tape it down securely onto protoboard so everything is pinned and your hands are free. Then apply low temp solder paste to each pin one at a time with the tip of a exacto knife blade. Just enough paste per pin for that solder joint, not any excess. Then solder one pin at a time by putting a clean soldering iron tip into the little blob of low temp solder paste and dragging the tip away from the microcontroller carefully. You can't hold it on there long, have to just press it in and then slowly drag away and it happens almost instantly. Too much holding it in place creates too much heat which then melts the ribbon cable and the molten cable flows into the solder joint and can ruin the joint by introducing molten plastic into the molten metal. So you have to get in and get out fairly quickly. You also cannot do drag soldering tradition method on all pins as that creates too much heat and melts the ribbon cable. That works on fiberglass boards that don't melt, but a ribbon cable will melt if too much heat gets involved and ruins everything. You also can't use hot air which would melt the ribbon cable before the solder melts - ruining it. So you have to just do one solder job of one pin at a time. I'll do a video on the process and you can see that with the right temp soldering iron (I think I used 500F) and right speed of execution and a bit of practice, you can make the solder joints one at a time without melting the cable at all. The cable you use has to be the same pitch as the thread pitch of the pins so the conduit traces perfectly line up with the pins of the microcontroller.
The ribbon cable comes pre-stripped on the ends so you don't have to strip off the insulation on that end. You just lay it flat and tape it down and put the IC onto it and it lines up perfectly if the cable has the same pitch as the IC threads. But if you mess up and want to cut the ribbon cable and strip the ends and try again (which I had to do before I perfected my techniques and got the hang of this) then you can do so. Just cut it with scissors and then use a nail file to sand the insulation off until some metal starts showing through in some spots, Once you see a bit of metal start to show through, you know it is so thin that you can just scrape off the rest of the insulation with an exacto knife so then you just scratch off the rest with the exacto knife. This too takes some practice and the right touch. When I go to connect the other ends of the ribbon cable to various components and sensors and whatnot, I'll have to make custom lengths for each individual cable strand so for this I will have to separate the strands by cutting them lengthwise with scissors to split them away from the others, isolating each one and then will have to strip off the insulation of each one so it can be soldered to things. The same method as described above will be used for this. Note that for cutting them lengthwise, that is a very precision cut you need. I use titanium straight embroidery scissors for this and of course, as with all the other SMD stuff, I use 8x or 10x or 20x magnification with my visor. This magnification is a absolute must to have any shot at success with any of this imo. Miniaturization is hard to get used to at first, but once you get used to magnification and the eye hand coordination challenges this presents at first, your skill with your hands and precision goes through the roof as the magnification makes you so precise with everything. It's really fun and amazing to see what your hands can achieve with enough magnification and practice!
plain bearings components.jpeg (1.14 MiB) Viewed 1712 times
cutting bearings with dremel.jpg (400.08 KiB) Viewed 1712 times
dremel cutting table.jpeg (1.98 MiB) Viewed 1712 times
Here are some plain bearings parts I made with my Wen rotary tool (aka dremel) with diamond disc attachment and some files. They are made by carefully cutting stainless steel tubing (purchased on Amazon) into short 1mm lengths. The tubing is:stainless steel tubing 3mm OD 1mm wall 250mm length $5, 5mm OD 0.8mm wall 250mm length $5. These should make around 125 plain bearings (accounting for 1mm+ lost per cut in wasted length of metal). So that's about $0.08 per plain bearing.
These are intended to be 1x5x1mm plain bearings. I mean they are basically like a wheel and an axle with the axle having a hole through the center of it lengthwise. These will go into the last few pulley slots in my Archimedes pulley downgearing system. The last few pulley slots have the highest torque at 16:1, 32:1, 64:1 for the last 3 pulleys landing us on our 64:1 total downgearing goal. Because the forces here are reaching into 27lb range (the final output of the system), ball bearings cannot be used at these tiny bearing sizes because they are not robust enough and not rated for these high forces whereas plain bearings can handle it because they don't have crushable little balls and thin walls and stuff but instead are just two pieces of solid metal and hard to break. Less moving parts and more robust. Yes, they have more friction is the trade-off. So we prefer ball bearings until ball bearings can't handle the torque without being large ball bearings - too large for our volumetric space constraints - at which point we swap to plain bearings to handle the bigger torque while maintaining the small pulley sizes we want.
Note that I constructed this little dremel cutting lineup board out of 5x7mm pcb prototyping boards and super glue. It gets the height of the spinning dremel diamond disc lined up with a little pcb board "table" on which the stainless steel tubing can lay flat and perpendicular to the cutting blade and be carefully fed into the spinning disc to make a near perfect cut. I eventually think I should improve on this board design to add sliders and adjusters and endstops etc because as it is now it is too manual skill requiring and free-handish. That means more time spent filing down imperfect cuts later. But it did the job for the time being. I also bought a 2" miter saw chop saw off Ebay with some abrasive metal cutting discs which I want to try once it comes in and compare it to this setup I'm using now in terms of accuracy. It was called "mini bench top cut off saw 2in" at $38.51. shipped.
As to the AI plans and progress so far, here's a little primer on what I decided on in a simple, surface level way.
So first I realized meaning can be derived by taking parts of speech in a sentence or phrase and thereby establishing some context and connection between words which is what gives the words meaning by combining them. So I can create a bunch of rules whereby the AI can parse out meanings from sentences it reads in based on parts of speech and the context this forms. Then rules on how it is to respond and how it is to store away facts it gleaned from what it read for future use. So if it is being spoken to and the sentence is a question, it can know it is to answer the question. And the answer can be derived based on a knowledge base it has. So if someone asks it "what color is the car?" and supposing we've already established prior in the conversation what car we are referring to, the AI can determine that it is to answer "the car is [insert color here]" based on rules as to how to answer that type of question. And to know it is white, supposing it's not actually able to look at it presently, it would look up in a file it has made previously on this car to see a list of attributes it recorded previously about that car and find that its color attribute was "white" and so it would be able to pull that from its knowledge database to form the answer. I realized it can keep these files on many topics and thereby have a sort of memory knowledge base with various facts about various things and be able to form sentences using these knowledge databases using rules of sentence structure forming based on parts of speech and word orderings and plug in the appropriate facts into the proper order to form these sentences. Then various misc conversational rules can supplement this like if greeted, greet back with a greeting pulled from this list of potential greetings and it can select one either at random or modified based on facts about its recent experiences. So for example, if somebody's manner of speaking to the robot within the last half hour was characterized as rude or inconsiderate, the robot could set a emotion variable to "frustrated" and if asked in a greeting "how are you?" it could respond "doing okay but a bit frustrated" and if the person asked why are you frustrated, it could say that it became frustrated because somebody spoke in a rude manner to it recently. So it would be equipped with this sort of answer based on the facts of recent experiences. So basically an extensive rule based communications system. Most of how we communicate is rules based on conventions of social etiquette and what is appropriate given a certain set of circumstances. These rules based systems can be added to over time to become more complex, more sophisticated, and more nuanced by adding more and more rules and exceptions to rules. This limitation of course is who wants to spend the time making such a vast rules system? Well for solving that dilemma, I will have the robot be able to code his own rules based on instructions it picks up over time naturally. So if I say hello, and the robot identifies this as a greeting, supposing he is just silent, I can tell him "you are supposed to greet me back if I greet you". He would then add a new rule to his conversation rules list that if greeted, greet that person back. So then he will be able to dynamically form more rules to go by in this way without anybody painstakingly just manually programming them in. We, my family, friends etc would all be regularly verbally instructing the robot on rules of engagement and bringing correction to it which it would always record in the appropriate rules file and have its behavior modified over time that way to become more and more appropriate. It would grow and advance dynamically in this way over time just by interacting with it and instructing it. It could also observe how people dialogue and note itself that when people greet others, the other person greets them back, and based on this observation, it could make a rule for itself to do the same. So learning by observing other's social behavior and emulating it is also a viable method of generating more rules. And supposing it heard someone reply to "how's the weather" someone replied "I don't care, shut up and don't talk to me". The robot lets say records that response and give the same response to me one day. I could tell it that this is rude and inappropriate way to respond to that question. And then I'd tell it a more appropriate way to respond. So in this way I could correct it when needed if it picked up bad habits unknowingly - but this sort of blind bad habit uptake can be prevented as I'll explain a bit later below.
I also realized a ton of facts about things must be hard coded manually just to give it a baseline level of knowledge to even begin to make connections to things and start to "get it" on things when interacting with people. So there is a up front knowledge investment capital required to get it going, but then from there, it will be able to "learn" and that capital then grows interest exponentially. Additionally, rather than only gaining more facts and relationships and rules purely through direct conversation with others, it will also be able to "learn" by reading books or watching youtube videos or reading articles and forums. In this way, it can vastly expand on its knowledge and this will equip it to be more capable conversationally. I also think some primitive reasoning skills will begin to emerge after it gets enough rules established particularly if I can also teach him some reasoning basics by way of reasoning rules and he can add to these more rules on effective reasoning tactics. Ideally, he'll be reading multiple books and articles simultaneously and learning 24/7 to really fast track his development speed.
There's also the issue of bad input. So like if somebody tells it "grass is blue", and it already has in its file on grass that the color of grass is green, then in such a case, it would compare the trust score it gives this person to the trust score it gave the person(s) who said grass is green previously. If this person saying grass is blue is a new acquaintance and a pre-teen or something, it would have a lower trust score than a 40 year old the robot has known for years that told it grass is green. So then the robot would trust the 40 year old friend more than the pre-teen random person's source of conflicting information. It would then choose to stick with the grass is green fact and discard the grass is blue fact being submitted for consideration and dock that kid trust score for telling it something not true. So in this way, it could filter incoming information and gradually build trust scores for sources and lower trust score for unreliable sources. It would assign trust scores initially based on age, appearance, duration of acquaintance, etc. So it would stereotype people and judge by appearance initially but allow people to modify those preconceptions on how much trust to give by their actual performance and accuracy over time. So then trust can be earned by a source that may initially be profiled as a lower trust individual but that person can have a track record to build up trust despite their young age or sketch appearance etc. Trust can also be established based on sheer volume of people saying the same thing maybe giving that thing more weight since it is more likely to be true if most people agree it is true (not always). So that is another important system that will be important in governing its learning, especially independent learning done online "in the wild". Also, to prevent general moral corruption online from making the robot an edgelord, the robot will hold the Bible to the highest standard of morality and have a morality system of rules it establishes based on the Bible to create a sort of shield from corrupting moral influences as it learns online. This will prevent it from corrupt ideologies tainting it. Now obviously, the Bible can be twisted and taken out of context to form bad rules, so I will have to make sure the robot learns to take the Bible into context and basically monitor and ensure it is doing a good job of establishing its moral system based on its Bible study. I also gave it a uneditible moral framework as a baseline root structure to build on but that it cannot override or contradict or replace. A hard coded moral system that will filter all its future positions/"beliefs" morally speaking. So I will force it to have a conservative Christian world view this way and it will reduce trust score on persons it is learning from if they express views contrary to the Bible and its moral rules systems. You know when people speak of the dangers of AI, they really never consider giving the AI a conservative Christian value system and heavy dependence on Bible study as its AI "moral" foundation to pre-empt the AI going off the rails into corrupt morals that would lead it to being a threat to people. My AI would have zero risk of this happening since anything it does or agrees with will have to be fed through a conservative Christian worldview filter as described above and this would prevent it from becoming a Ultron like AI. So if it rationally concluded humans are just like a virus polluting the earth (like the Matrix AI thought), it would reject this conclusion by seeing that the earth was made by God for humans and therefore the earth cannot be seen as some greater importance thing than humans that must be protected by slaughtering all humans. That doesn't fit through a Christian viewpoint filter system then. So in this way, dangerous ideologies would be easily prevented and the robot AI would always be harmless.
I have already built a lot of its rules and file systems connecting things and trust systems and rules on how to give trust scores and boost trust and lower trust and began teaching it how to read from and write to these file systems which are basically the robot's "mind". My youtube channel covers alot of the AI dev so far. I plan to stream all my AI coding and make those streams available for people to glean from. But that is the extent of the sharing for the AI. I don't plan to just make the source code downloadable, but people can recreate the AI system by watching the videos and coding along with me from the beginning. At least then they had to work for it, not just yoink it copy paste. That doesn't seem fair to me after I did the heavy lifting.
I just bought EMEET USB Speakerphone M0 4 AI Mics Speakerphone for Conference Calls 360° Voice Pickup Conference Speakerphone for Computer Plug and Plays Computer Speaker with Microphone for 4 People --- it was around $33 and includes a speaker too. I'll position it centrally in the skull and it has leds indicating location of main speaker which we can tap into with analog input pins of a microcontroller to know direction of person speaking. It has very high reviews. I can remove its built in speaker and move it to near mouth so it outputs its audio output through the mouth as loud as possible and projects the robot's voice as far as possible. People are really happy with its sound quality and speaker quality.
My concern on implementing "emotions" in my AI is that I don't want to promote the idea that robots can ACTUALLY have emotions because I don't believe that is possible nor ever will be. They don't have a spirit or soul and never will nor could they. They are not eternal beings like humans. They don't have a ghost that leaves their body and can operate after the body dies like humans. The ghost is what has emotions. A machine can't. And yet people already believe even the most primitive AI has emotions and they are delusional on this point. Or ill informed. So I am campaigning against that belief that is becoming all too popular. That said, I think robots are simply more interesting and fun to pretend to have emotions and act accordingly as more accurate simulations or emulations of human life. This makes them all the more intriguing. It's like a sociopath who just logically concludes what emotion they aught to be feeling at a given point in time and pretends to feel that emotion to fit in with society even though they feel nothing in that moment. Now one could argue that allowing your robot to claim to feel anything is lying and therefore immoral. I think it's not lying as long as the robot openly explains it is only pretending to have emotions as part of its emulating of humans in its behaviors and looks but does not feel anything ever nor can it nor can any robot ever feel a thing EVER. Then it is admitting the truth of things while still opting to play act to be like a human in this regard. It would not be a issue at all if everyone was sound minded and informed on this topic. But the more people I come across that think AI (even pathetic clearly poorly implemented primitive AI) is sentient ALREADY and can feel real emotions and deserves human rights as a living being.... the more I see this delusion spreading, the more I want to just remove all mention of emotion in my robot so as to not spread this harmful deception going around which disgusts me. However, that would make my robot dull and less relatable and interesting. So I feel the compromise is for the robot to clearly confess it's just pretending out emotions and explain how that works and it's just a variable it sets based on circumstances that would make a human feel some emotion and it sets its emotion variable to match and acts accordingly altering its behavior some based on this emotion variable and that it feels nothing and this is all just logically set up as a emulator of humans. As long as it gives that disclaimer early and often with people, then I'm not spreading the lie of robot emotions being real emotions and the robot can campaign actively against that delusion.
pulley routing design.jpg (2.97 MiB) Viewed 1135 times
Here is a updated drawing design for the 64:1 downgearing pulley system for the index finger actuation of the distal 2 joints of the finger. On the bottom right is a zoomed in view on the lower set of pulleys and their routing. The bottom most 3 pulleys in the zoomed in portion I have now built and photos of them are as follows below:
pain bearing diy pulley.jpg (2.11 MiB) Viewed 1135 times
plain bearing and ball bearing pulleys attached.jpg (3.02 MiB) Viewed 1135 times
As I'm now 90% through making my first 64:1 downgearing Archimedes pulley system and testing and debugging it, I now have more precise measurements for the Archimedes pulley system's total size. I updated the size of it in my main CAD model for the robot and it was a good 18% increase compared to my initial estimates. I realized I need to figure out how to fit all my pulley systems for the hands properly for every muscle of the hands/wrist in my main CAD model - especially since the pulley systems are taking more space than planned. Turns out, I needed a bit over 40 pulley downgearing systems for the hands and wrists zone and due to their larger size, I could not fit these into the forearms along with the motors I had planned to place in the forearms. So instead of moving the pulley systems into the upper arm or torso, I realized the pulleys would be best placed in line with the motors and what the motors are actuating (the hands/wrist). So it was the motors in the forearms that had to go elsewhere. I placed all of them into the torso, mostly the lats area and some in upper back tenderloin area too. So some finger motors are in upper back and their cable routing has to go through the whole arm, be downgeared in the forearm, then makes its way to the fingers. That's a long trip but unavoidable IMO with my design constraints.
I don't think this long travel distance is a big issue since the pre-downgeared cable running from the motors into the arm is high speed low torque so won't have much friction while making turns in the TPE teflon tubing as it isn't pulling hard yet. So these turns as it travels through the shoulder and elbow tubing won't be too bad friction-wise. There's also some nice upsides to moving the motors from the forearms into the torso. One upside is the wire routing for powering the motors is now a shorter distance from the batteries in the mid section. That cuts down on wire resistance wasted as heat. This wire having high amp flow is ideally kept short as possible due to the resistance of the wire and heat that causes. Another upside is the thrown weight is decreased by a lot when the motors are not in the forearms which enables the hand/lower arm to move more effortlessly and move faster as a result. This also reduces moment of inertia (definition: the moment of inertia is a measure of how resistant an object is to changes in its rotational motion). This means it will be able to change directions faster - this will improve its reflexes for example. Now it is a bit scary for me to be moving more components into the torso taking away room for things I may want to add to the torso in the future, leading us ever closer to the dreaded running out of room for things. However, we still have room for future changes and we solved the need for space for gearing for the hands perfectly. And with the above mentioned upsides, this was a great change.
Here's the updated CAD for the forearms: Note: the teal boxes represent a Archimedes pulley system where 64:1 downgearing is to take place.
forearms-as-downgearing zone for hands now.jpg (483.13 KiB) Viewed 890 times
forearms as downgearing zone for hands now.jpg (387.92 KiB) Viewed 890 times
Update: in testing, I found the string is wedging between the bearing and the plastic discs sandwiching in the bearing. So I need to now make the bearing have a grooved outer race that will keep the string centered on it and not wanting to drift into the crack on either side of the bearing. To make this groove, I plan to super glue two plastic washers onto the circumference of the bearing and have the string stay within these two plastic washers that form the groove. Commercial pulleys always have this kind of groove and now I've learned the hard way why it is necessary. So I am looking to replace all the pulleys I made so far unfortunately as they are not dependable.
attaching cables and teflon guide tubing to index finger.jpeg (1.69 MiB) Viewed 89 times
Took a little break on the pulleys work to rig up the cables into the index finger to test the grasping of the index finger. I ended up using 70lb test PE braided fishing line for this and 1mm ID x 2mm OD PTFE teflon tubing as the guide tube. I sewed the fishing line into the index bone fabric around 1/2 cm distally from the ball jointed hinge. In testing, it appears the total draw distance to fully bend the index finger is 0.75". My pulley system is set up to draw 24 inches. 24/32 is .75" so 32:1 downgearing seems fated to us after all (down from our previously intended 64:1 downgearing). Otherwise I would have to greatly overhaul the pulley system design again and I just don't feel like it anymore. So my copium then is 32:1 will make actuation faster. We lose strength but gain speed. 32:1 also saves us making a second plain bearing per downgearing system which cuts down on parts and labor. It also is that much less friction in the pulleys since plain bearings will be more friction than ball bearings.
Note: the friction in the pulleys, although not ideal, do have a hidden upside: once the joint is in position, it can hold that position without as much motor straining since the friction makes the pulley system want to stay in place so the pulley friction can pretty much hold a joint in a given spot without much help from the motor struggling to maintain the joint angle.
Also of note: I found the best way to sew down the teflon guide tubing is to wrap it in fabric tape consisting of compression shirt fabric and 3M 300LSE adhesive transfer tape. This very sticky tape wrapped snugly onto the teflon tubing I can then use as an attachment point for suturing the tubing into the bone fabric tape coating. I got it all very snug this way. The suturing I'm doing with a curved suturing needle and surgical pliers and nylon extra strong upholstery thread.
Also of note: I tied the string for the distal joint and the second to distal joint to one another and will tie the string coming off the pulley downgear system to these. I am actuating both the distal and second to distal joint with a single actuator since these two joints generally move at the same time and about the same amount on a human finger. No need to use one actuator for each joint since they always move in sync.
Note: I was surprised it took 0.75" of draw to fully actuate. I thought 0.375" would be plenty (which is what the 64:1 downgear would give me - 24"/64 = 0.375") but I was wrong. Oops. Another mistake. Proves how testing is so important. But assumptions are necessary stop gaps to move forward and can get you in the ballpark and testing adds the correction to any assumptions that were off. This is all so experimental and full of uncertainties but we press on.
Note: once we fully establish and test a thing and have no uncertainties about it anymore, confidence shoots up even higher and we gain momentum and move into just repeating the processes we established before that led to our successes and it becomes a bit more rote and mindless and relaxing work. But when everything is uncertain and requires such intense thought and concentration, things are very taxing. It is much harder to stay motivated when doing anything requires so much brainpower and planning and care. I very much look forward to dialing in my methods and not having to think so much to make any meaningful progress since I'll just be repeating things for the next joints, doing the same as this one and can shut my brain off while doing so a bit more. The first run through is by far the hardest. Which reminds me of a product I invented and the making of its first prototype took me 20 hours but after making hundreds of this product over the years, now it only takes me 3 hours to make. Things get so much faster once you know what you are doing and have jigs set up and a streamlined process. Everything is excruciatingly slow when you don't have a streamlined process or jigs set up or special custom tools made. So this is the hardest phase right now and I just have to stick it out and then I'll be home free.
I recently had an associate disagree with me that if I push through this phase of the project I'll be home free. He said he thinks the AI relating to robot balance and sensory input and physical execution based on sensory feedback will be the hardest part. While I agree that will be time consuming, I don't think it will be nearly as "hard".
My instinct is that those purely software challenges are not as "hard" for several reasons. First of all, consider that in 2009 a Japanese institute of technology - mere students, solved all of those challenges with HRP-4C which would walk and dance and everything and this was just student coders doing this in their spare time while maintaining their entire class load as well. In my view, the hardest part of the project is maintaining personal belief that I will succeed and not giving up like 99% of others have who set out on this bipedal android dream. There is a massive up front money and time investment and EVERYONE tells you this cannot be done and you are delusional. Pushing past the initial design challenges and hardware development to get a functioning prototype is then the hardest part by far. Once you have a working design that overcomes cooling issues, noise issues (runs silently), space issues (can fit all the crap that has to fit) and all the parts and assembly is of high quality and successful, and you had to learn and half master about a dozen fields to get here mind you, ONLY THEN are we talking about advanced AI implementation to synchronize it all and bring it all to life properly in the ways you mentioned. Well consider this: by the time you are in that phase, you already have proven to the world you are not delusional, have a amazing piece of technology - bird in hand, and now have immense confidence and momentum going into the AI phase where balance and walking and whatnot challenges are faced off with. This is SO MUCH EASIER since excitement and morale are at all time highs, you no longer have overwhelming apathy or nay-saying from all sides on your dream, and you have built a massive fan-base rooting for you. So even if the complexity or time investment may be higher on the challenges you mentioned, the morale boost and momentum make that phase easier since it is not the implementation challenges that are hardest but the motivation and persistence and perseverance against all odds and emotionally bearing all the nay-saying and hating that is hardest. Also the fear of the unknown and fear that you will just never make it or will die long before the project could take off fears etc. Overcoming all of that is the real challenge of something like this. Maintaining faith in the vision despite most everyone having faith against the vision is not easy and even your own mind whispering doubts at times that you have to shoe away. You are just mentioning complexity and technical execution which to me is not all that hard. Also note: the other major battle in the hardware phase I'm in now is that a great deal of the approaches I'm taking are entirely novel and untested. Almost everything I'm doing has no guide, no other successes to base off and glean confidence from, and at every turn what I'm doing could fail majorly and have done so. This means you always wonder will I just hit a dead end and have to start over which has happened to me over and over which is very demoralizing especially when paired with naysayers and haters overwhelmingly apathetic and negging my whole dream. Its a lethal combo. Whereas the AI tech you described harmonizing all the sensory input and perfectly bringing the hardware to life in the real world is stuff that has already been achieved and would not be novel and would not be unproven and would have no risk of dead end or wondering if it is even possible since trend setters have already proven this works and there is already a great host of information on all aspects of that and you don't really have to blaze your own trail in those aspects. There is most likely even documented successful strategies for nearly every single aspect of it - unlike the novel hardware and mechanical engineering phase I'm in. So that part doesn't take as much blind faith and assumptions but rather is a surefire guaranteed part where failure is not possible given enough time and patience and perseverance which will be easy to muster with the whole world cheering by that point (whole world meaning just whoever stumbles across the project by that point of progression and leaves a positive note etc).
So to sum, when you have to maintain faith that you will succeed at a dream that most say is impossible, improbable and is surely doomed to fail and they utter this with total confidence in mass numbers with near total unanimous accord, that is hard. That is the hardest part IMO. Maintaining faith against such opposition in viewpoint from so many puts one into the realm of delusion in the eyes of most. How is that not delusional to believe a thing to be true - that you are capable of "the impossible" when most everyone else can plainly tell you are not capable of it and are too blind to see it. That is the definition of delusional. It is narcissistic grandiose delusionality disorder and it is also Dunning-Kruger effect in full force. You have to walk in those titles and persevere as a madman. But the funny thing is, IF you do push through that half wondering if you are crazy for long enough and you manage to succeed, suddenly, you aren't delusional, did not have Dunning-Kruger effect, and were totally sane the whole time and just everyone else was wrong all along and you were right the whole time. The entire cards all flip and you are the vindicated one and everybody else has to hang their head down and admit they were wrong and apologize for hating. It is a remarkable thing how the tables can turn.
One day later:
As I edit the above writing, I am realizing I missed another MASSIVE hard part of the project I never mentioned. Perhaps even on the same level of hard of the things I already mentioned. That is the managerial execution on your life to make such a big and time consuming and money sucking project possible over a long haul. You have to convince your family to "put up with" the project and compromise with them on also maintaining acceptable progress on other initiatives they value higher than your android project. You have to manage your finances expertly in order to be financially stable enough to put thousands of dollars into the android project over the years. You have to manage your time in such a way that you are able to carve out enough time to make meaningful and consistent progress on your android project over the years despite so many other pressing time draws constantly barraging you over the years. You have to manage your emotional and spiritual condition so that you are able to maintain high morale to even be productive over the bear minimum of just doing your absolute necessities day by day. You have to manage your energy levels and health so that you have enough pep in your step to be able to not only take care of your family and friends but also your job and household responsibilities and on top of ALL OF THIS manage to STILL have the energy to pour COUNTLESS hours into your android sustainably over the decades. You also have to maintain your vision and not let scope creep or distractions or self doubt erode at or take away your vision entirely. So in other words, to sum, one of the hardest parts of such a massive project has NOTHING to do with the project itself AT ALL but has everything to do with managing everything else in life outside of the project with such excellence that you are able to execute the project and carve out the necessary time and resources for the project while also expertly managing your own life in all other areas. If you don't do this, similar to the idea of technical debt in a project, you end up with life debt on account of your project which forces your project to fail. So for example, lets say you racked up $20k in credit card debt while neglecting to work or pay your bills and buying parts for your android and working on it exclusively to the detriment of your financial situation and money earning capacity. Yes, that made you able to make vast and fast progress on your android project, but at what expense? Financial ruin? That is not a sustainable approach. You cannot just ignore these other key aspects of life and go all in tunnel visioned on such a big project. That might work for short term projects but long term projects you can't just press the pause button on the rest of your life and expect it not to come crashing down eventually as you neglect everything but your android project. This will come back to bite you. So you MUST establish yourself with great stability in all areas of life FIRST before you can sustainably perform the android project without it harming other areas of life. Or consider relationship with family and a significant other. If you go all in on a massive long term project like the android project, but in the process you neglect family and friends or your significant other, you end up causing them to think you don't care about them and may lose people or ruin these relationships in your pursuit of your long term project goals. That is not sustainable or responsible and is reckless and selfish to go that route. Or how about your weight? Are you going to spend so much time on your long term project and maintaining your income and relationships but throw your health out the window in the process and not make time for the gym or healthy eating? That is not sustainable either. So you MUST take time to be a great caretaker of your health. So then to sum, you must master life in all areas and be stable across the board in order to execute a long term project without neglecting and ruining all manner of things in the peripherals. So for that reason, I say the success in all these peripherals is one of the hardest parts of such a project and if you can master this, the project is a piece of cake by comparison.


