Sewing basic pointers/thoughts, to help (or discourage) those who might want to try their hand at making clothes for their dolls:
What you need as a minimum:
Number zero, without this it will be hard: The ability to visualize and manipulate 3-dimensional objects in your mind. Clothes are sewn together inside-out, so that when they are done and turned right side out, the seams are on the inside. Planning how to put things together the wrong way round, so that they end up the right way round, can be...exasperating.
When choosing a design, form a clear idea in your mind how you will fit the finished garment to the doll, without unnecessarily wearing out or overstressing her joints. Anything that is small enough to fit nicely around her hourglass waist, will have to stretch or split (with buttons, Velcro or a zipper) to pass over either her hips or her shoulders/boobs. Kindly ignore any of the following that is too obvious.
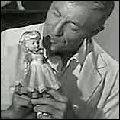
1. Needle for hand sewing short distances, attaching buttons or press studs, etc. It really cuts down on the frustration if you have a threading tool to get the thread through the needle. Also for threading a sewing machine's needle, because with all the shiny metal around, it is hard enough just to see what is the real needle and what is reflection. Detail picture of how it is used, below.
2. Thread, white is the most useful but other colors become necessary as you go along. Perfectly matched colors look great, but are especially hard to see when you have to unravel a mistake. I know nothing about the types of thread, that's for real experts.
3. Measuring tape, the soft ones sold for sewing are the best, the metal one from your toolbox will do, but it does not like following curves, and with most of our dolls, curves are what make us love them!
4. Scissors. One pair of good quality sewing scissors, for cutting fabrics and thread only, cutting stuff like paper with it, blunts it real quickly. Use your general household scissors for that.
A rotary fabric cutter (like a small pizza cutter) is useful, but then you need a dedicated cutting board on which to use it, and when there are too many grooves on the board, you have to toss it and buy another one. Scissors work anywhere, even in the air.
5. A marker pen, of the ones that have water-soluble ink, it washes out with cold water when you are done.
6. Pins or small clamps, to hold fabric and pattern or two layers of fabric together while you work, you never have enough hands and your doll can't move her hands with you as you work. Dolls are great for holding something steady in one place, though. The piece of foam that is often found at the top of a bottle of pills, is a good cushion to hold pins until you need them. In the first picture below.
7. A table, desk or piece of smooth board of about 1 meter/1 yard square, where you can lay your work out. The board can be put on a bed for working, and stored leaning against a wall. If you use a table or desk, everything that tends to gather on it, needs to be removed and stored elsewhere, before you can start your sewing, and then you are frustrated before you even get started.
8. A pick tool (in the first picture below) for taking apart stitching, when you have made a mistake or the quality is just not to a standard that you set for yourself. Pulling apart and starting over is almost inevitable as you learn, don't let it get you down.
9. A sewing machine if you are going to get serious. Doing anything more than an inch/few centimeters straight and even, by hand and needle, will take a lot of practice and patience.
10. Patterns may be useful for a flowing skirt or loose-fitting top, but for anything close-fitting, a pattern will need to be adjusted using actual measurements from your doll, because dolls rarely follow human proportions. I also find professional patterns hard to understand, too many lines because they provide for different sizes, so you must know which lines to ignore, it is clearer if I make my own templates from old newspaper. Add a bit extra in areas like shoulders/upper arms and crotch/upper legs, I made that mistake with Geniece's fluffy winter pj's, they are difficult to fit because they are too tight in those areas. Especially her arms need to move when you fit the clothing, so the shoulder area in particular, needs some extra freedom of movement. It is also fairly easy to sew a new seam and cut off the excess if it is too loose-fitting, not so the other way round.
For starters, duplicating a simple bought item, like a panty or plain top, is a good way to gain practice and confidence:
a. measure each panel of the existing item, writing down the dimensions next to a rough drawing of the approximate shape of each panel, and then draw it as near as you can to the correct shape and size, on a piece of newspaper. Measurements between opposite corners help to get the shape right, if sides are not parallel. Alternatively trace each panel onto paper directly. Tracing paper is great, but old newspaper and a brightly colored marker (not the one in 5. above), does the job well enough, and no loss if you have to toss it in the bin and start over. Cut out paper templates can even be taped together and held against the doll to see if it looks like it might fit, just not for long, because printing ink may stain.
b. once you are satisfied with the paper templates, they can be laid out on your fabric, and moved around to see how you can fit all the panels into the available fabric, to minimize offcuts. Just keep orientation of the panels in mind if the fabric has a color pattern, or stretches more in one direction than the other, or if the fabric has an obvious top side and underside. Lay the templates out to provide for a left panel and a right panel, or you could end up with two lefts or two rights, or color patterns running at different angles. For symmetrical left and right panels, some people fold fabric in half and put the template's centerline on the folded edge, then the left and right come out correctly by itself, but I find it difficult to keep track of where to put what, I rather cut left and right panels, even if they are symmetrical. Remember to add about 1/2 to 5/8 inch/ 10 to 15 mm seam allowance right around the edges. You can "measure" the allowance by eye, no need for it to be exact. When everything seems ok, mark out each panel on the fabric, using the water-soluble marker, and cut. If two panels are symmetrical (mirror images), it is quite ok to mark it out for the one side, flip it over, and mark out the other side, no need for two templates.
11. The ability to visualize the finished item in your mind, helps to plan what sides to attach first, and what can be done later, otherwise you may find that a place where you need to sew, is obscured by sewing you have already done. Hard to understand? Yes I know, but I don't know how else to put it.
Sewing machine operations:
1. Remember that the two "outside" sides of the fabric are placed against each other, so that when the finished item is turned right side out, the seams end up on the inside. (Requirement zero at the top, remember?)
2. When you have the pieces of fabric together and under the foot of the sewing machine, hold the free end of the top thread for the first second or two of sewing, it really loves to pull back out of the needle and then you have to start over.
3. It takes some "feel" to feed the fabric layers along as you sew, without working against the machine's own feeding mechanism. Especially with stretchy fabrics, I try to hold the fabric some distance in front of and behind the needle, to keep it just tight enough to flatten any folds, but not stretch it. Stretchy fabrics need a stretch fabric needle, and need zig-zag stitches, straight stitches can't stretch.
4. At the start and end of a length of sewing, leave long enough free ends of both threads so that you can tie the top and bottom (or inside and outside) ends of the thread together in a double or triple knot, to stop them from unraveling at a later stage. It looks neatest if you can give the inside free end a tug so that the last stitch of the outside thread starts to pull through to the inside, then you can pull it through completely, and tie the two free ends together so the knot will be on the side that will not be visible. Then trim off the remaining free thread close to the knot.
Elastic waist bands, etc.
The simplest way to put elastic at the upper edge of a pair of shorts, for example, is to sew a slightly wider seam and leave a little gap somewhere (on the inside), so that you can pull a piece of elastic right through, and attach the two free ends to each other, either by sewing, or a simple knot, if appearance is not important. To pull the elastic through, attach a small safety pin to one end (see first picture below), and put it in through the gap in the seam. Feed it through slowly, bunching up the fabric so that the other end does not disappear into the gap. Once the two ends are joined, you just redistribute the bunched up folds evenly. The piece of elastic must be short enough to be tight around the waist when fully relaxed, but long enough to go over her hips, or shoulders/boobs when stretched to its maximum, remember?
Anything I've forgotten? Just ask, maybe I can answer.

- Left to right and top to bottom: Cushion of pins, safety pin and elastic, needle threading tool, pick tool, water-soluble marker
- IMG_20240311_151507.jpg (34.29 KiB) Viewed 170 times

- Detail of threading tool: Put the fine wire loop through the eye of the needle, put the thread through the wire loop, pull the tool out of the needle, slip the tool off the nearest end of the thread, while holding the other end and the needle together, or the tread will pull out of the needle again, just to test your patience! Yes, the needle is slightly bent, so what, this is not a Paris fashion house!
- IMG_20240311_143513.jpg (33.03 KiB) Viewed 170 times


Do you need a expensive machine to start with it?