Page 4 of 5
Posted: Mon Jan 05, 2009 12:23 am
by HawgCallr
Well, I just spent most of the day taking pictures of my new Miss Autumn BT, Rita. I took over two hundred pictures and burned through six batteries! I experimented with a lot of different settings. One thing I do agree on with everybody else is that any photos taken with the flash were the worst ones of the lot. I ended up with some photos I really liked, and some that were so-so. The most important thing is that I had fun, and that is what taking pictures of your doll is about-having fun.
Posted: Fri Dec 18, 2009 9:45 pm
by Szalinski
1. When using natural sunlight, your best bet is an overcast (not cloudy) day, especially for softening the subject and avoiding "glossy" highlights. natural sunlight will also give the most realistic colors, because your eyes are normally "white balanced" to it.
2. In bright sunlight or when limited to a single studio light source, reflective surfaces, like cardboard with a bright white surface or covered with crinkled aluminum foil (the matte side), or even a flash unit covered with tissue paper can be used as a fill light to soften shadows.
3. If you are using flash, try to bounce it off of a matte surface rather than pointing it at the subject, remember, the color of that surface will affect the color of the light. Note: Most "on board" flash units cannot be aimed, so if your camera allows you to fire a seperate flash using a synch cord, do so.
4. An angled bounce that lets the eyes of your subject "see" some of the flash directly will restore the "glint' into the eye without making the overall light too harsh.
5. Use film, it will give a more natural look to the photo (Why do you think camera manufacturers are always comparing the images made by their digital cameras to it?). Digital photographs, regardless of the megapixel count are still graphic mosaics and this tends to impart a synthetic appearance to the photograph. This effect gets worse the greater the enlargement of the image.
Posted: Mon Dec 21, 2009 12:26 pm
by Incrediwagon
Szalinski wrote:
5. Use film, it will give a more natural look to the photo (Why do you think camera manufacturers are always comparing the images made by their digital cameras to it?). Digital photographs, regardless of the megapixel count are still graphic mosaics and this tends to impart a synthetic appearance to the photograph. This effect gets worse the greater the enlargement of the image.
I will never go back to film. The advantages of digital over film are to numerous these days.
I think the biggest reason is this hobby. Nobody wants to bring their film to the local drug store and have the girl behind the counter say "nice beaver".
Posted: Mon Dec 21, 2009 2:13 pm
by mytime
Hi all,
Film can do wonderfull things, which we can not do digitally, however I see film only needed for people who know how to use it and who take the benefits from it, or people who use ancient photo camera's to create art, e.g. Sally Man (actually she does not use film but glass!).
For us, for several reasons digital camera's are an advantage.
The biggest advantage is that we can directly adjust the settings and take a new photograph if the photograph was not what we wanted.
If you want to get the most out of dollphoto's for most of us, the best way is to buy good digital equipment, if DSLR make your choose wich brand (Nikon, Canon, Sony, ...) to use carefully because you will probably stick to that brand long time because you will buy more lenses for that brand.
The equipment will cost money but the ability to take photo's for free instead of paying for having them developed from film will make your learning course to become an experienced photographer a lot more affordable.
Mytime & Helen & Carmen
Posted: Sat Jan 02, 2010 10:36 am
by Dragoneye
Mind if I also say that (For me) one of the Biggest Advantages Digital has over Film is Pure COST.
When you consider how many pics that you take are useless,
and how Few are "Keepers", that adds up FAST.
Myself i usually have (At best) a 10% "Keeper" to "Loser" Ratio.
Just my 2 cents worth.
Posted: Sat Jan 09, 2010 6:47 am
by Elle
Hi Mytime & all

mytime wrote:
Film can do wonderfull things, which we can not do digitally, however I see film only needed for people who know how to use it and who take the benefits from it, or people who use ancient photo camera's to create art, e.g. Sally Man (actually she does not use film but glass!).
I remember my dear sister who was a professionnal photographer working for an agency in Paris, she did stock her expansive films into her fridge

; at this time, with films, no photoshopping was allowed, it was not easy to take great photos, you had no second luck

But today even the professional photographers use the best DSLR and they need to know Photoshop or they subcontract the post processing.
Hey Mytime, after trying to improve my skills with the Flash i bought after you posted some great photos of Helen (with Flash), i did not obtain the same results, my beloved has a shiny face and this will never change
So i took 2 measures :
- i bought a daylight kit for photographie, composed of a silver umbrella, 2 x 300 watts bulbs (5400K daylight), a tripod and the electric support.

It cost me 135 euro but it changed my life, as my house is dark and i now have a true day light in each room i want when i want. Most of the shadows disappear as 600 watts is a lot of light

- i bought a new Face 8 from Abyss. Amanda confirmed me that they do not sell a face without makeup and sealer so i bought it as is, but she told me that it would not be a shiny face except if a flash is used and it's perfectly true
I've no more problem of shiny areas with Supermod'Elle (name of Elle's clone) except a small spot on the right eyebrow.
All of that to say that the daylight kit is a must to own
if you want a very easy to use daylight system. It exists with different power of lightning and size of umbrella, here is the url of the french sellor at Ebay but i guess the same models exist everywhere.
The seller at Ebay France
Cheers,
Jihan and Elle
Posted: Sat Jan 09, 2010 7:08 am
by kharn
Wow Jihan and Elle, that's some very nice lighting
Here is a good site to help improve your photgraphy.
Digital Photography School
Do you want to improve your portrait photography?
Posted: Sat Jan 09, 2010 9:58 am
by Everhard
I have started using one of those bulbs too. Mine is 65 Watts and it is marked 6400 K, which I assume is the temperature of the light it generates in degrees Kelvin. I found it on eBay, but in a general section, not the photography section. Anyways, it works well, although it is a bit top-heavy and wobbly on my old wooden bedside lamp stand.
Posted: Sat Jan 09, 2010 12:05 pm
by Elle
Hi Kharn & Everhard
Yes a very nice lightning but made in RPC (republique populaire de Chine) so the plastic parts are not very good : the bolts are weak and the umbrella has a tendancy to hang down itself
Here a Kelvin scale i found :
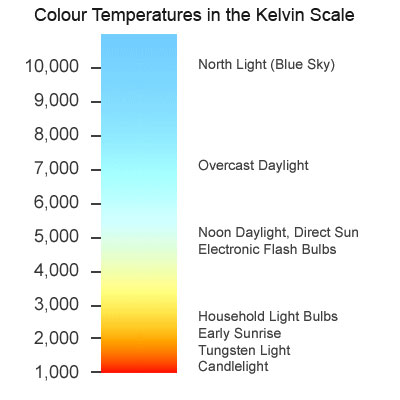
6400 K is almost an overcast daylight but still daylight. But the most important thing, in my opinion, is the umbrella which distributes the daylight in a regular manner everywhere, you should add one to your kit
Having 2 bulbs of 300 watts is cool too because 600 watts is sometimes too much for small room.
Elle with the umbrella and the 2 bulbs on, 1m50 behind Elle (1/30s 5.0)

Cheers,
Jihan & Elle
Re: Basic Techniques To Get Great Shots Every Time
Posted: Sun Feb 27, 2011 7:45 am
by Everhard
Elle wrote:But the most important thing, in my opinion, is the umbrella which distributes the daylight in a regular manner everywhere, you should add one to your kit
I am starting to use an umbrella like that one, although there is not always enough room for it in the tight spaces I sometimes work in. Previously I used a rectangle of slightly rumpled aluminium foil taped up behind the daylight bulb.
Another great help is a purpose-made doll stand. We have been a bit stuck here in Britain for such things, but now G. of the UK Love Doll Forum is making excellent doll stands. (See
this topic.) Here are my first two photos taken using the new stand:
 Egyptian Princess
 Sand Dance
I took about one minute to assemble it. A superb peice of engineering. Although a hefty chunck of steel, I carried it a half mile from the Post Office to home with the package slung over a shoulder. (I changed shoulders periodically.)
I reccommend the option to have the removable base. Carrying it disassembled is way easier than getting it through doorways assembled, and it takes only seconds to re-attach it.
(The shadow of the pole in the photo is leaning over because, 1, the fence is bowed back and, 2, the stand was in fact leaning because of the uneven ground. In case you were wondering...)
This earlier photo of Anoushka leaning against the bar at Alektra's castle was done with a G. stand:
 Bar Girls
Re:
Posted: Thu Mar 03, 2011 11:31 pm
by Szalinski
Gearhead wrote:<snip>Be aware of the distortion that occurs from shooting too close to your subject. A classic example of this is a beaver shot framed by a pair of feet several times larger than the furry little rodent. When you have the option, I would recommend shooting from as far away as practical and zooming in. This will also give you greater depth of field.
This is the reason many fashion and portrait photographers use a medium telephote lens (100-135mm on a 35mm camera). It lets them stand back to avoid that close-up distortion* and yet still fill the frame.
*(actually, it is not a distortion - if you were to put your eye as close as the camera lens, what you saw would look the same.)
Re:
Posted: Thu Mar 03, 2011 11:48 pm
by Szalinski
Dragoneye wrote:Mind if I also say that (For me) one of the Biggest Advantages Digital has over Film is Pure COST.
When you consider how many pics that you take are useless,
and how Few are "Keepers", that adds up FAST.
Myself i usually have (At best) a 10% "Keeper" to "Loser" Ratio.
Just my 2 cents worth.
The keeper to loser ratio depends on the person pressing the shutter, not the medium being "exposed". For those unwilling or unable to learn
how to take a good photograph, perhaps a camera that does most of the thinking for them and that allows them to get away with 100 mistakes in the quest for that one good shot would be a good thing.
As for cost: A very good film SLR will set the photographer back about $200. An equivalent quality DSLR, about 10 times that or more. I don't know about you, but I can buy/develop a lot of film for $1,800 (and once scanned, can do in photoshop all the neato stuff the digital can do, and more)! And film cameras are usually more rugged; the smallest bump can throw a delicate digital right in the repair bin, while my 30 year old Nikon FE has been clicking along great. Even though it's been jostled through the deserts of Arizona and Utah, from the heights of the Sierra Nevada mountains, to the sands of Egypt and the plains of Tanzania and Kenya.
Re: Basic Techniques To Get Great Shots Every Time
Posted: Thu Apr 14, 2011 4:12 pm
by l121314
real helpful...thanks!
Re: Basic Techniques To Get Great Shots Every Time
Posted: Fri Sep 23, 2011 3:05 am
by xiwi555
This will also create something known as "noise" (visible pixels in the darkest areas and shadows of the photo). Noise is considered very undesirable- so most photographers prefer to shoot at a lower ISO. The Canon tends to be the most superior in this category, allowing you to shoot at the highest ISO with minimal amount of "noise".
When shooting in bright sun a lower ISO like 100 is best.
When shooting in low light situations, shooting at a higher ISO like 800 is best.
_______________________________________
cheap necklace necklaces on salebuy necklacesjewelry sale

Re: Basic Techniques To Get Great Shots Every Time
Posted: Fri Sep 23, 2011 10:09 am
by 1jayjay
Hi xiwi555, welcome to the forum.
I hope you like it here and enjoy the place.
Are you a keen photographer? And do you have a doll? Don't panic, this isn't an innterrogation

just curiosity.
I notice you quote Stacy there from this part of this thread....
ISO determines the "films" sensitivity to light. Since we are talking about digital, I'll just refer to it as light sensitivity. A low ISO such as 100 will be the least sensitive to light. A higher ISO such as 800 will be more sensitive to light. The more sensitive to light the lighter the photo becomes. If you are shooting by candle light, you might want to shoot at the highest possible ISO. This will also create something known as "noise" (visible pixels in the darkest areas and shadows of the photo). Noise is considered very undesirable- so most photographers prefer to shoot at a lower ISO. The Canon tends to be the most superior in this category, allowing you to shoot at the highest ISO with minimal amount of "noise".
When shooting in bright sun a lower ISO like 100 is best.
When shooting in low light situations, shooting at a higher ISO like 800 is best.
I hope that explains ISO in a way that is easy to understand. If you have any other questions, just ask away.
Stacy
If you follow that advice you'll never go far wrong.
If you read this thread, if you already haven't. It's full of very informative stuff. It's going to give you a lot of useful information on photography.
Hope to see you around.