sexyrealsexdolls.com

Follow along (and help me) as I learn how to airbrush silicone nipples

Mods, Repairs & Maintenance related specifically to not specifically listed Silicone Dolls
User avatar
Gizmoses
Contributing Poster
Contributing Poster
Posts: 32
Joined: Thu Dec 14, 2023 12:57 am
Contact:

Re: Follow along (and help me) as I learn how to airbrush silicone nipples

Post by Gizmoses »

Great progress. Your learning alot. The matte stuff sounds like a real pain to work with.
Have you tried powdering the glossy pink yet to see if that takes alot of the shine away? If I recall, using baby powder can make a shiny doll more matte.

I'm still new to all this and haven't even gotten my first doll yet. But it's on order. I presume I'll be in your shoes eventually extending the life of my silicone girl at some point. So I appreciate the knowledge your learning and sharing. :glou:

User avatar
RevJack
Doll Elder
Doll Elder
Posts: 2806
Joined: Fri Jun 25, 2021 11:18 am
Location: East Coast
Contact:

Re: Follow along (and help me) as I learn how to airbrush silicone nipples

Post by RevJack »

Please remember folks, this is not "paint" it is a thinned and tinted two part platinum cured silicone.
That's why the matt thinner changes the results, it is putting a solid foreign substance into the silicone.
That's also why it is such a bitch to clean out of the airbrush, there is no solvent for fully cured silicone.

You are absolutely killing it on this project! Bravo, and thank you!

Reverend Jack
Reverend Jacks Roamin' Cadillac Sex Doll Repair. Roamin' the land fixin' dollies and handing out salvation from the back of his Cadillac.

ALSO TRY Reverend Jack's Anointed Snake Oil, good for cleansing stains from the body and the Soul! Step right up folks, only $5 a bottle! We got plenty to go around! Cash only please.

Aibei 158 Blue Elf, AS 157, XES 128, OR 156G, WM 160C (r), Sanhui 168 (r), WM 157B, WM 138D (Faun), Mistress 168 (r), 6YE 100 (Bubbles)

dparson
Active Member
Active Member
Posts: 123
Joined: Sat Dec 15, 2018 2:27 pm
Contact:

Re: Follow along (and help me) as I learn how to airbrush silicone nipples

Post by dparson »

Justinpassinthru wrote: Tue Jan 09, 2024 3:08 am My main takeaway is that I'll simply buy a new doll when it comes time to repaint her. :haha4:
So true :) If it's any consolation I'll hopefully figure out how to achieve my "goal" picture and all this detail will save you some effort. I never learned how to paint so jumping into learning to airbrush using silicone-based products is probably one of the worst ways to get started.

dparson
Active Member
Active Member
Posts: 123
Joined: Sat Dec 15, 2018 2:27 pm
Contact:

Re: Follow along (and help me) as I learn how to airbrush silicone nipples

Post by dparson »

Gizmoses wrote: Tue Jan 09, 2024 3:11 am Have you tried powdering the glossy pink yet to see if that takes alot of the shine away? If I recall, using baby powder can make a shiny doll more matte.
I'm sure it would do the job temporarily but was hoping to get the matte finish that's possible with silicone. I feel like powder almost seems to soak into TPE while it feels more like it sits on top of silicone and is easily wiped off. Days after powdering TPE you can run your finger over it and it feels like smooth skin while on silicone it simply feels like there's powder on top of silicone...at least with this doll's silicone :)
Gizmoses wrote: Tue Jan 09, 2024 3:11 am I'm still new to all this and haven't even gotten my first doll yet. But it's on order. I presume I'll be in your shoes eventually extending the life of my silicone girl at some point. So I appreciate the knowledge your learning and sharing.
Hopefully it will last a good long time! The doll I'm working with here is also my first silicone one but it was pretty inexpensive for silicone and probably not made to last. Actually on day one the nipples were in bad shape and they just got worse from there.

dparson
Active Member
Active Member
Posts: 123
Joined: Sat Dec 15, 2018 2:27 pm
Contact:

Re: Follow along (and help me) as I learn how to airbrush silicone nipples

Post by dparson »

Well I finally achieved a matte finish, the key was EXTREMELY LIGHT coats of the matte paint mixture. I did this overtop of an existing glossy finish and also built up a color entirely with EXTREMELY LIGHT coats of matte. Going overtop existing glossy paint is an order of magnititude faster and easier, but I wonder if the harder approach would last longer.

First though, a correction about matte paint shrinking; it turns out that both the matte and normal paint shrink. If you compare the far left, non-matte tan color to the airbrushing_42 picture from yesterday, you'll see it has now shrunk to be the same diameter of the matte colors to its right. I did some digging and came across https://www.smooth-on.com/tutorials/shr ... e-solvent/ which confirms it's just the act of putting thinner into any silicone that causes it to shrink. So I expect the lower two, larger paint remains from yesterday will be this smaller size tomorrow.
airbrushing_55.jpg
airbrushing_55.jpg (312.74 KiB) Viewed 422 times
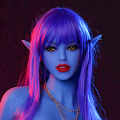
Here's how the doll looked in the morning, pretty strange with the different coloring.
airbrushing_51.jpg
airbrushing_51.jpg (189.42 KiB) Viewed 422 times
The side with the coverup color and layers of too-light of pink came off easily with the underlying petrolum jelly. It takes awhile to get all the tiny bits off but I didn't spend a ton of time since more petrolum jelly was about to be applied.
airbrushing_52.jpg
airbrushing_52.jpg (161.79 KiB) Viewed 422 times
airbrushing_53.jpg
airbrushing_53.jpg (180.38 KiB) Viewed 422 times
airbrushing_54.jpg
airbrushing_54.jpg (152.56 KiB) Viewed 422 times
I prepped a lot of cling wrap and paper towels to aid in cleaning for the many layers of paint planned for today.
airbrushing_56.jpg
airbrushing_56.jpg (536.75 KiB) Viewed 422 times
This color was alot closer to what I was hoping to achieve compared to the sad mixing efforts of yesterday. It's a color in betwen the too-red on the left and too-pink on the right. I later added the thinner to create a paint composed of 1g part A, 1g part B, 2g matte thinner, and 1g normal. But I quickly encountered a clog and had to introduce about 1-2g more normal thinner. For this cheap airbrush at least, the paint needs to drip off a mixing stick in drops, if the paint forms a thin stream or is in any way stream-like, it's too thick and will splatter and quickly get clogged inside the needle cap.
airbrushing_57.jpg
airbrushing_57.jpg (298.99 KiB) Viewed 422 times
And here's the setup with cleaning tools and cling wrap to help preserve the paint as the day progresses. Having a longer pipette would be handy since the tiny one that came with the airbrush is too short to reach into the bottom of the thinner bottle. Every time thinner is needed I have to carefully tip it for the pipette to reach and I don't have a shorter bottle with cap and don't want to let it sit out in an open mixing cup since it evaporates so quickly. I end up using thinner all the time: to ensure the airbrush is working before adding paint, to thin the paint mixture as it thickens through the day, and to clean the airbrush after finishing a layer.
airbrushing_58.jpg
airbrushing_58.jpg (153.55 KiB) Viewed 422 times
And here's the quick work of making the too-red and glossy nipple into a matte finish, just a single, EXTREMELY LIGHT coat of the matte paint. I was planning to do many more coats but after the matte was applied, it really hid the doll's original pink color. This result is from 2 layers of matte paint that was too thick to achieve the matte finish, then one more EXTREMELY LIGHT layer of matte.
airbrushing_59.jpg
airbrushing_59.jpg (133.24 KiB) Viewed 422 times
airbrushing_60.jpg
airbrushing_60.jpg (115.77 KiB) Viewed 422 times

dparson
Active Member
Active Member
Posts: 123
Joined: Sat Dec 15, 2018 2:27 pm
Contact:

Re: Follow along (and help me) as I learn how to airbrush silicone nipples

Post by dparson »

Here's the progression of the other nipple as it started with just a coat of petroleum jelly, all the way to layer 5 where I was happy with the coverage and matte finish. The stencil was used to establish a consistent circle on the first layer, then each additional layer was done freehand. I waited at least 30 minutes between layers since discovering the paint was no longer wet and instead felt tacky to the touch after this amount of time. At the start of each layer I tested the paint for thinness and with the help of the cling wrap, only had to add thinner a few times. Before the start of each layer I also confirmed the airbrush was not clogged by spraying a small amount of thinner before adding the paint. At the end of each layer I flushed the airbrush with thinner until it sprayed clear and took off the nozzle cap and needle cap to clean them. Throughout the process the finish maintained a matte look; when any hint of gloss started to appear I stopped. I think the coloring of layer 4 matched "the goal" picture but at the time was more focused on coverage and 4 didn't seem enough. I might try making the color slightly less red for the next test but it's a challenge since the color changes as layers are added.
airbrushing_61.jpg
airbrushing_61.jpg (215.75 KiB) Viewed 415 times
airbrushing_62.jpg
airbrushing_62.jpg (246.58 KiB) Viewed 415 times
airbrushing_63.jpg
airbrushing_63.jpg (254.77 KiB) Viewed 415 times
airbrushing_64.jpg
airbrushing_64.jpg (225.11 KiB) Viewed 415 times
airbrushing_65.jpg
airbrushing_65.jpg (246.73 KiB) Viewed 415 times
airbrushing_66.jpg
airbrushing_66.jpg (271.4 KiB) Viewed 415 times
So lots of progress today. I still need to think about next steps but it was great to finally see a matte finish!

One thought is the additional effort to setup, paint, clean, and repeat every 30 minutes with so many layers is a huge time investment, but maybe all this work results in a more durable matte that will last.

Any ideas for an accelerated durability test? I've got this interesting setup now where one nipple has a single layer of matte paint overtop a glossy finish while the other is composed of 5 well-matted layers. I could peel the paint off each and throw them in a dishwasher or something :)

dparson
Active Member
Active Member
Posts: 123
Joined: Sat Dec 15, 2018 2:27 pm
Contact:

Re: Follow along (and help me) as I learn how to airbrush silicone nipples

Post by dparson »

Here are the results from yesterday after the paint dried. It's matte in some lighting conditions but definitely glossy with my desk lights here. I've tried heavy coats, light coats, and yesterday the marathon of extremely light coats and it just doesn't seem to match what the pros do. My guess is the particles in the matte thinner are too embedded in the paint to achieve the bumpy surface texture needed for the matte appearance. The matte thinner somewhat works but it's inconsistent and leaves tons of tiny glossy parts. The thin coats might help because the particles are forced to be closer to the surface while drying, but it's still not good enough and I can't do lighter coats than what I did yesterday.
airbrushing_67.jpg
airbrushing_67.jpg (195.4 KiB) Viewed 377 times
airbrushing_68.jpg
airbrushing_68.jpg (180.37 KiB) Viewed 377 times
I started looking for another matting process and came across the world of "reborn" doll painting. There's videos on YouTube that show an entirely different approach where the doll is painted with normal, glossy paint, then you coat the surface with a very thin layer of partially thinned silicone using a sponge (non-latex to be compatible with silicone) and apply matting powder (fumed silica) with a makeup brush. After it cures you rinse the powder off and are left with a matte finish. The idea is all the fine powder washes away to leave a microscopic texture on the layer of silicone to give it the matte look.

So another order is in the mail. I already have some fumed silica so the 4oz jar shown here is just for illustrative purposes. I included a small 150mL bottle to hopefully make using the thinner a lot easier than the pipette that came with the airbrush set. The makeup brush set is just a cheap one I found that was in stock and has many large brushes that should be good for powdering. They might be single-use after the silicone on them cures.
airbrushing_70.png
airbrushing_70.png (240.3 KiB) Viewed 368 times
There were lots of little sticky balls of paint and dried petroleum jelly as I cleaned the doll. Initially I used tape to get them up and that wasn't working very well, but powder did the trick and after rubbing it around the sticky bits, water rinsed everything away easily. I washed the doll with soapy water a couple of times and essentially pressed the reset button and got the surface back to its default state. It's a testimate to silicone on how nothing wants to stain or permanently stick to it, the 1 year old surface still looks pristine. Pretty different than my previous TPE dolls.
airbrushing_69.jpg
airbrushing_69.jpg (409.81 KiB) Viewed 377 times
Once the order comes in I'll get back to it. I'll use up the matte thinner just so it doesn't go to waste but won't be buying any more in the future. All the reborn doll videos are giving me hope that this new process will work.

DaPoohMe1
Apprentice
Apprentice
Posts: 12
Joined: Tue Jan 09, 2024 8:39 pm
Contact:

Re: Follow along (and help me) as I learn how to airbrush silicone nipples

Post by DaPoohMe1 »

Hello,
I have a doll with 6cm nipples... how can I shrink them with Spraying? Thanks

dparson
Active Member
Active Member
Posts: 123
Joined: Sat Dec 15, 2018 2:27 pm
Contact:

Re: Follow along (and help me) as I learn how to airbrush silicone nipples

Post by dparson »

DaPoohMe1 wrote: Wed Jan 10, 2024 8:42 pm Hello,
I have a doll with 6cm nipples... how can I shrink them with Spraying? Thanks
I'm still learning how to do this as well so can't really answer fully. I think I've got the paint making and airbrushing figured out but haven't yet achieved a matte finish.

Based on the testing I've done it's not possible to cover existing colors with silicone paint, it's too translucent (see my failed coverup attempt here viewtopic.php?p=2476595#p2476595). So I think your only hope is to remove the existing color. So if you can do this...if the existing color will peel off you can then airbrush a new color on and then apply a matte finish. If you can't remove the paint then I'd guess it would take a 1-2mm thick layer of silicone that matches your doll's base color to cover the existing color. I don't know how to create such a layer though, I guess it would be a mold-making process and it would take a long time to learn and execute well.

User avatar
Gizmoses
Contributing Poster
Contributing Poster
Posts: 32
Joined: Thu Dec 14, 2023 12:57 am
Contact:

Re: Follow along (and help me) as I learn how to airbrush silicone nipples

Post by Gizmoses »


Skip to 2 minutes and 30 thirty seconds to see a manufacturer spray matte nips

dparson
Active Member
Active Member
Posts: 123
Joined: Sat Dec 15, 2018 2:27 pm
Contact:

Re: Follow along (and help me) as I learn how to airbrush silicone nipples

Post by dparson »

Gizmoses wrote: Thu Jan 11, 2024 2:19 am Skip to 2 minutes and 30 thirty seconds to see a manufacturer spray matte nips
This is TPE though. I used lipstick to recolor some of my previous TPE dolls and it would go on matte and stain the TPE since it's so pourous. It wouldn't last very long but it was quick and painless to repeat every couple of months. Others would use makeup powders and mineral oil. Unfortunately silicone is a whole other beast. As viewtopic.php?p=2477316#p2477316 noted, the community figured out TPE painting awhile ago but there's not much here on silicone.

User avatar
Gizmoses
Contributing Poster
Contributing Poster
Posts: 32
Joined: Thu Dec 14, 2023 12:57 am
Contact:

Re: Follow along (and help me) as I learn how to airbrush silicone nipples

Post by Gizmoses »

Oops. Not sure why I was thinking it was silicone in the video.

DaPoohMe1
Apprentice
Apprentice
Posts: 12
Joined: Tue Jan 09, 2024 8:39 pm
Contact:

Re: Follow along (and help me) as I learn how to airbrush silicone nipples

Post by DaPoohMe1 »

dparson wrote: Wed Jan 10, 2024 10:05 pm
DaPoohMe1 wrote: Wed Jan 10, 2024 8:42 pm Hello,
I have a doll with 6cm nipples... how can I shrink them with Spraying? Thanks
I'm still learning how to do this as well so can't really answer fully. I think I've got the paint making and airbrushing figured out but haven't yet achieved a matte finish.

Based on the testing I've done it's not possible to cover existing colors with silicone paint, it's too translucent (see my failed coverup attempt here viewtopic.php?p=2476595#p2476595). So I think your only hope is to remove the existing color. So if you can do this...if the existing color will peel off you can then airbrush a new color on and then apply a matte finish. If you can't remove the paint then I'd guess it would take a 1-2mm thick layer of silicone that matches your doll's base color to cover the existing color. I don't know how to create such a layer though, I guess it would be a mold-making process and it would take a long time to learn and execute well.

Thank you for responding!! I asked the manufacturer to shrink the nipple and they only made it larger by changing the color.. They look like moster nipples!! I've got to figure out something. She does have Tan lines... I wonder if that will help fixing or making her nipple worse.

DaPoohMe1
Apprentice
Apprentice
Posts: 12
Joined: Tue Jan 09, 2024 8:39 pm
Contact:

Re: Follow along (and help me) as I learn how to airbrush silicone nipples

Post by DaPoohMe1 »

Once I receive her I will post a picture and see advice I get on how to fix the issue

User avatar
Gizmoses
Contributing Poster
Contributing Poster
Posts: 32
Joined: Thu Dec 14, 2023 12:57 am
Contact:

Re: Follow along (and help me) as I learn how to airbrush silicone nipples

Post by Gizmoses »

Found this video and figured I'd share for anyone researching this.


Post Reply

INFORMATIONS